Introduction / Overview
In this article, you will learn how to configure WooCommerce to work with the WooCommerce Memberships add-on, and the WooCommerce subscriptions add-on.
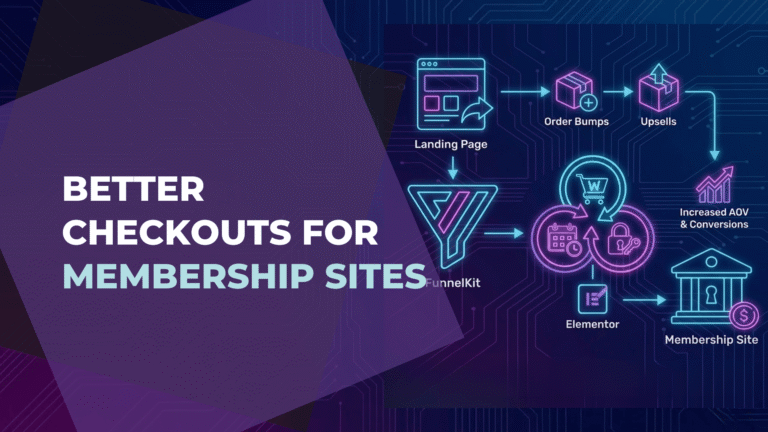
With this setup you'll be able to create beautiful funnels that will bring more revenue to your business using the built-in upsell functionalities of FunnelKit.
And you'll be able to accept subscription payments to grant people access to your membership site.
If you already have a membership website and are planning to migrate to WooCommerce, contact us—we can help. 🙂
Requirements
1- WooCommerce – this is the WordPress shopping cart plugin that serves as the foundation for this setup.
2 – WooCommerce Memberships – this WooCommerce extension allows you to create membership levels and sell access to your membership site, courses, or gated community.
3 – WooCommerce Subscriptions – this extension allows you to accept subscription payments from a variety of payment processors. Note that not all payment processors are supported out of the box. If you're using an uncommon payment processor, you may need an additional extension. The good news about the WooCommerce ecosystem is that there is a great chance that such an extension exists.
4 – FunnelKit – FunnelKit turns WooCommerce into ClickFunnels…only better! It basically allows you to set up unlimited, beautiful funnels and checkout pages, upsells / downsells / order bumps, and to increase the conversion rates on your offers as well as the average order value (AOV) of your customers.
5 – Elementor – This page builder works very well with FunnelKit and is super easy to use.
Installing all required plugins
Install WooCommerce
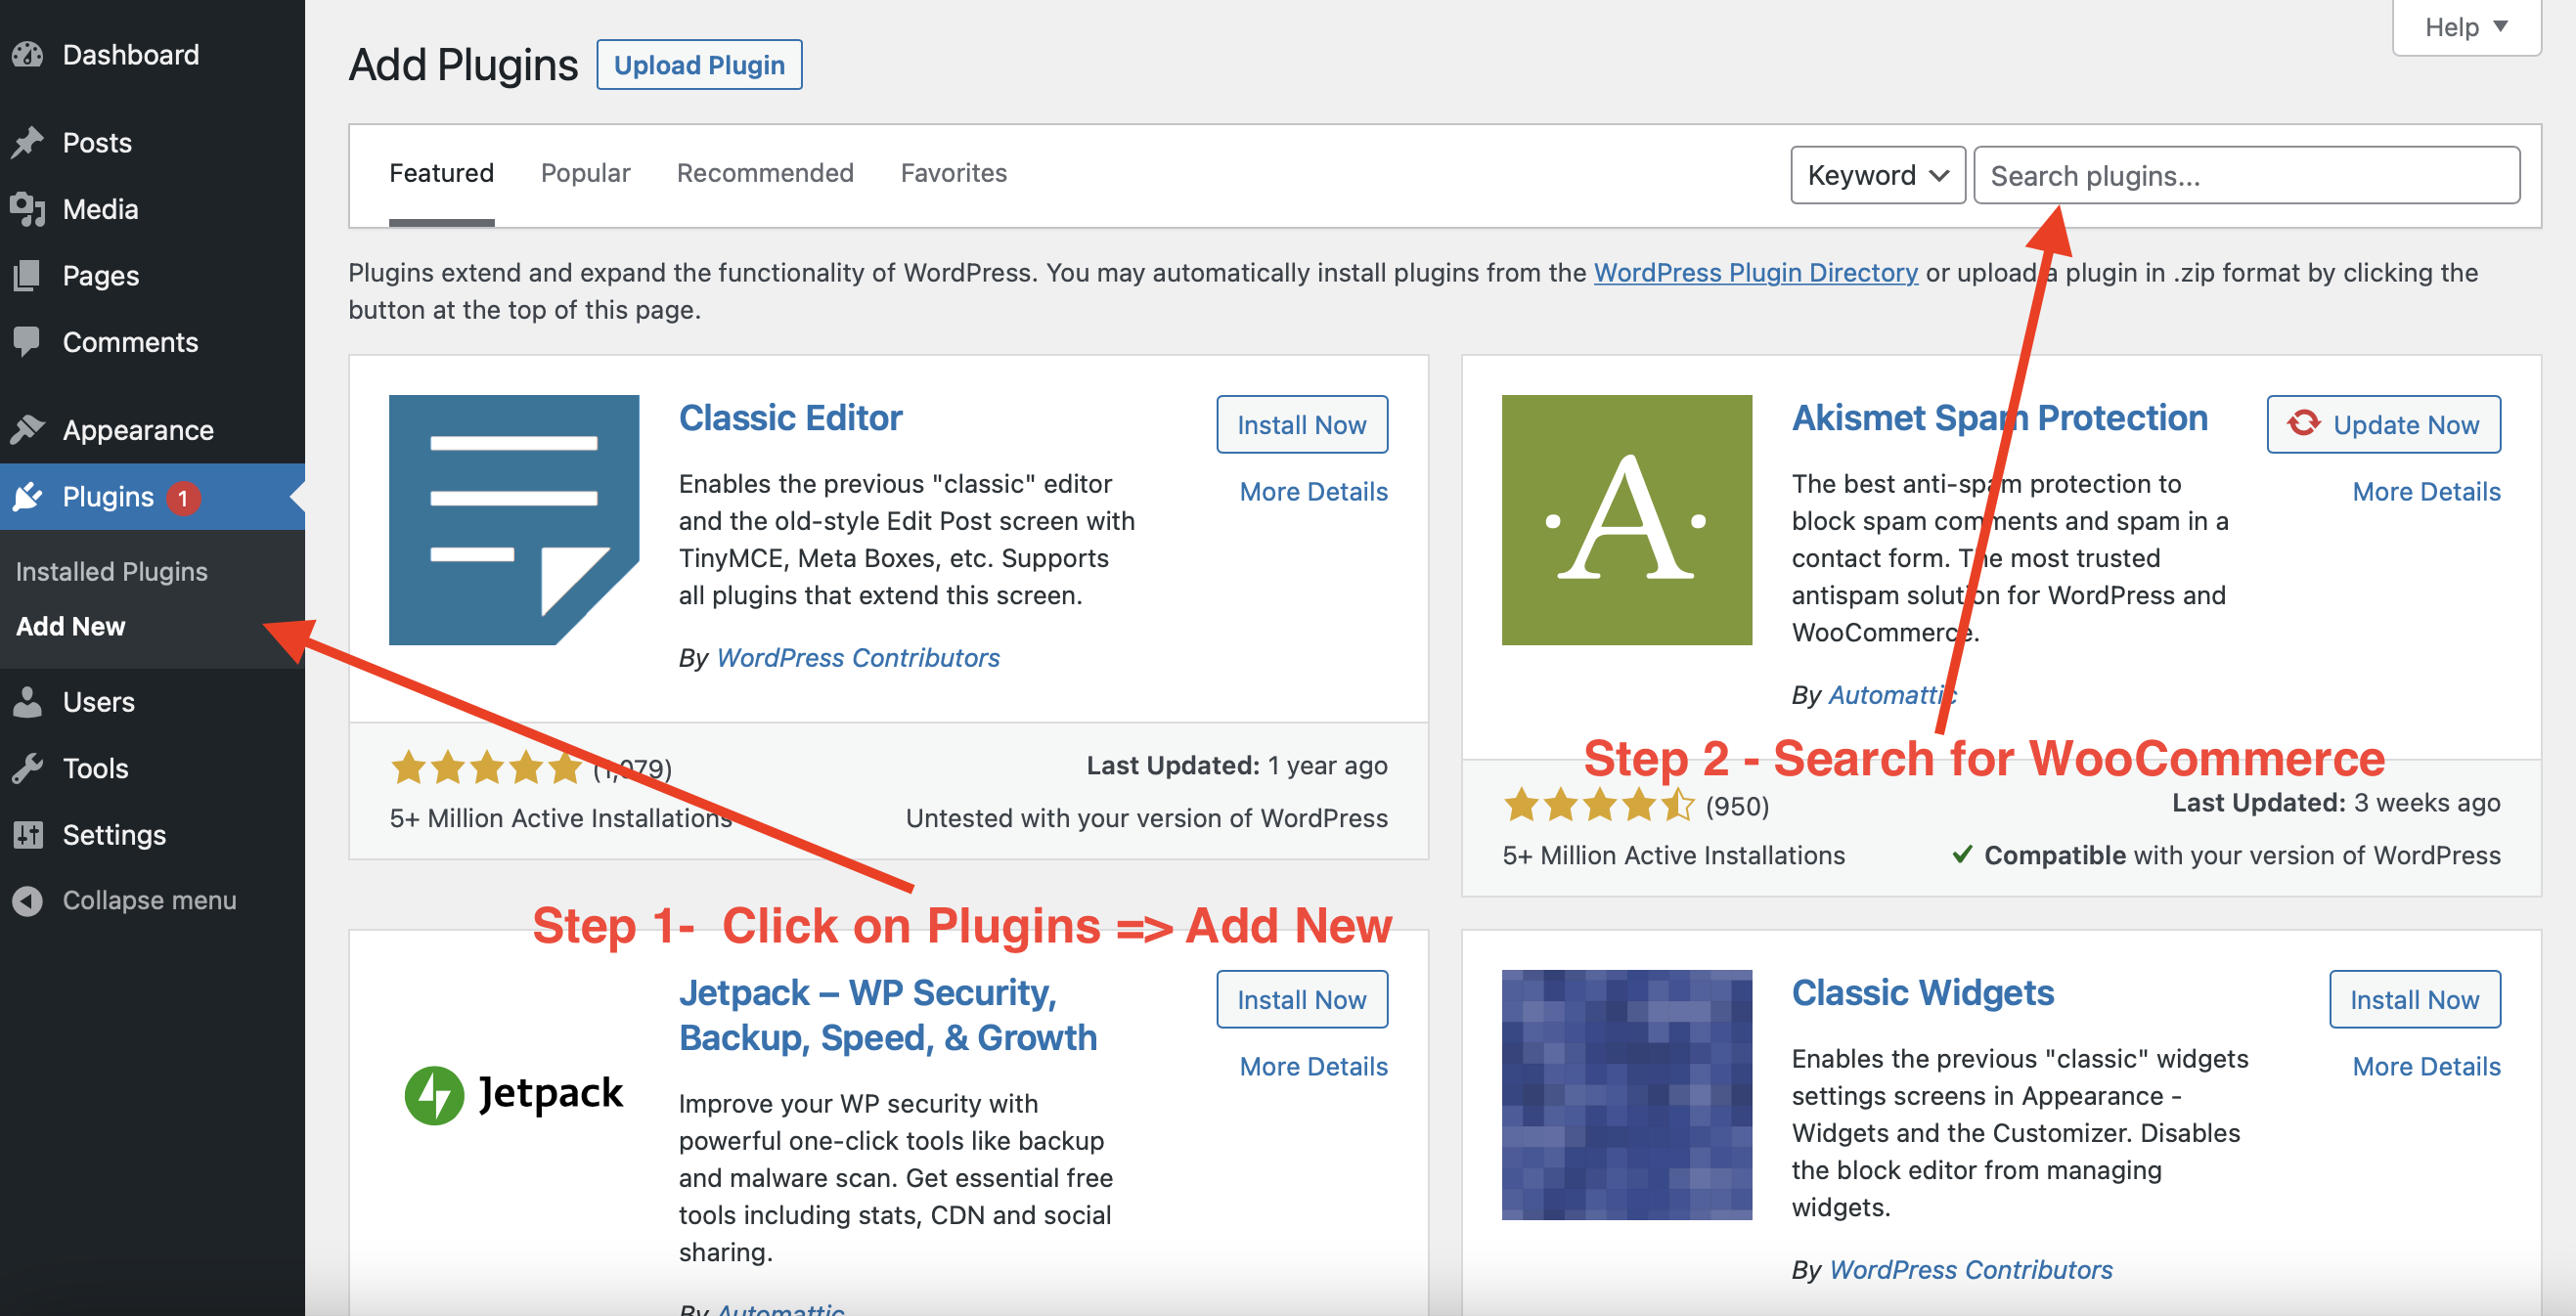
1 – Go to Plugins -> Add New
2 – On the search bar, search for WooCommerce
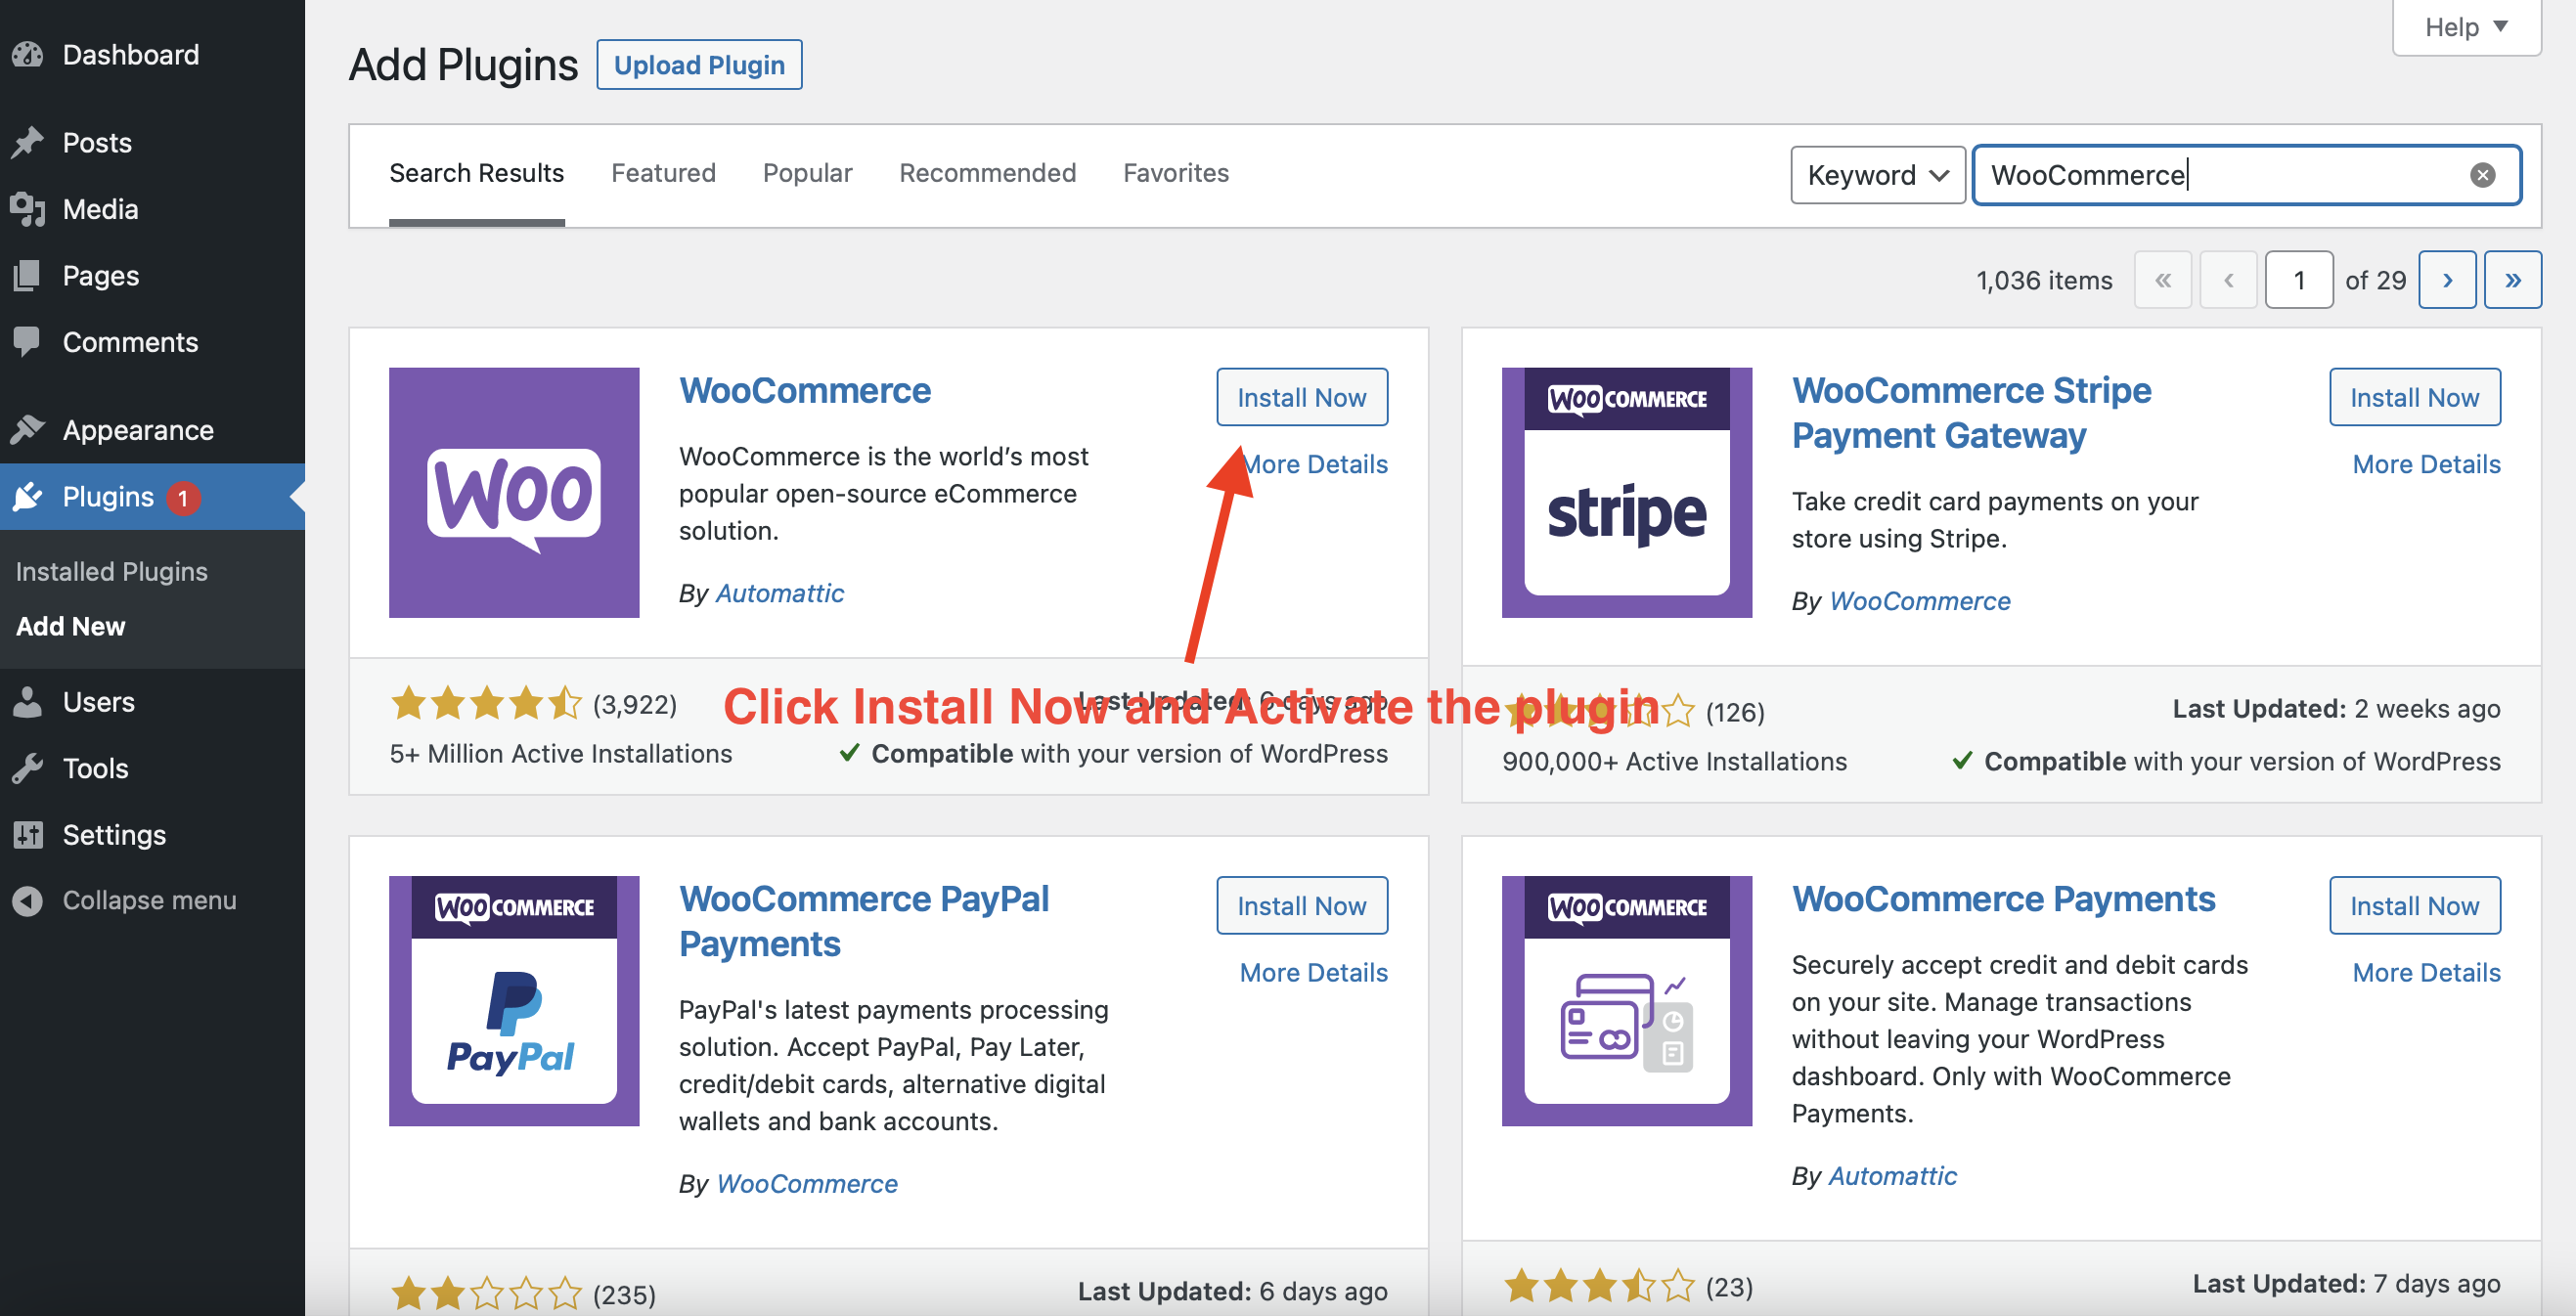
3 – Click Install Now on the WooCommerce plugin and Activate it
4 – (Optional) Go through the WooCommerce store setup. This includes store details, address, etc.
Install FunnelKit
1 – After purchasing the FunnelKit plugin, go ahead and download it to your computer.
2 – Log in to your WordPress website and access the Admin Dashboard.
3 – Go to Plugins -> Add New
4 – Click Upload and attach the zip file that you downloaded from FunnelKit.
5 – Click Activate
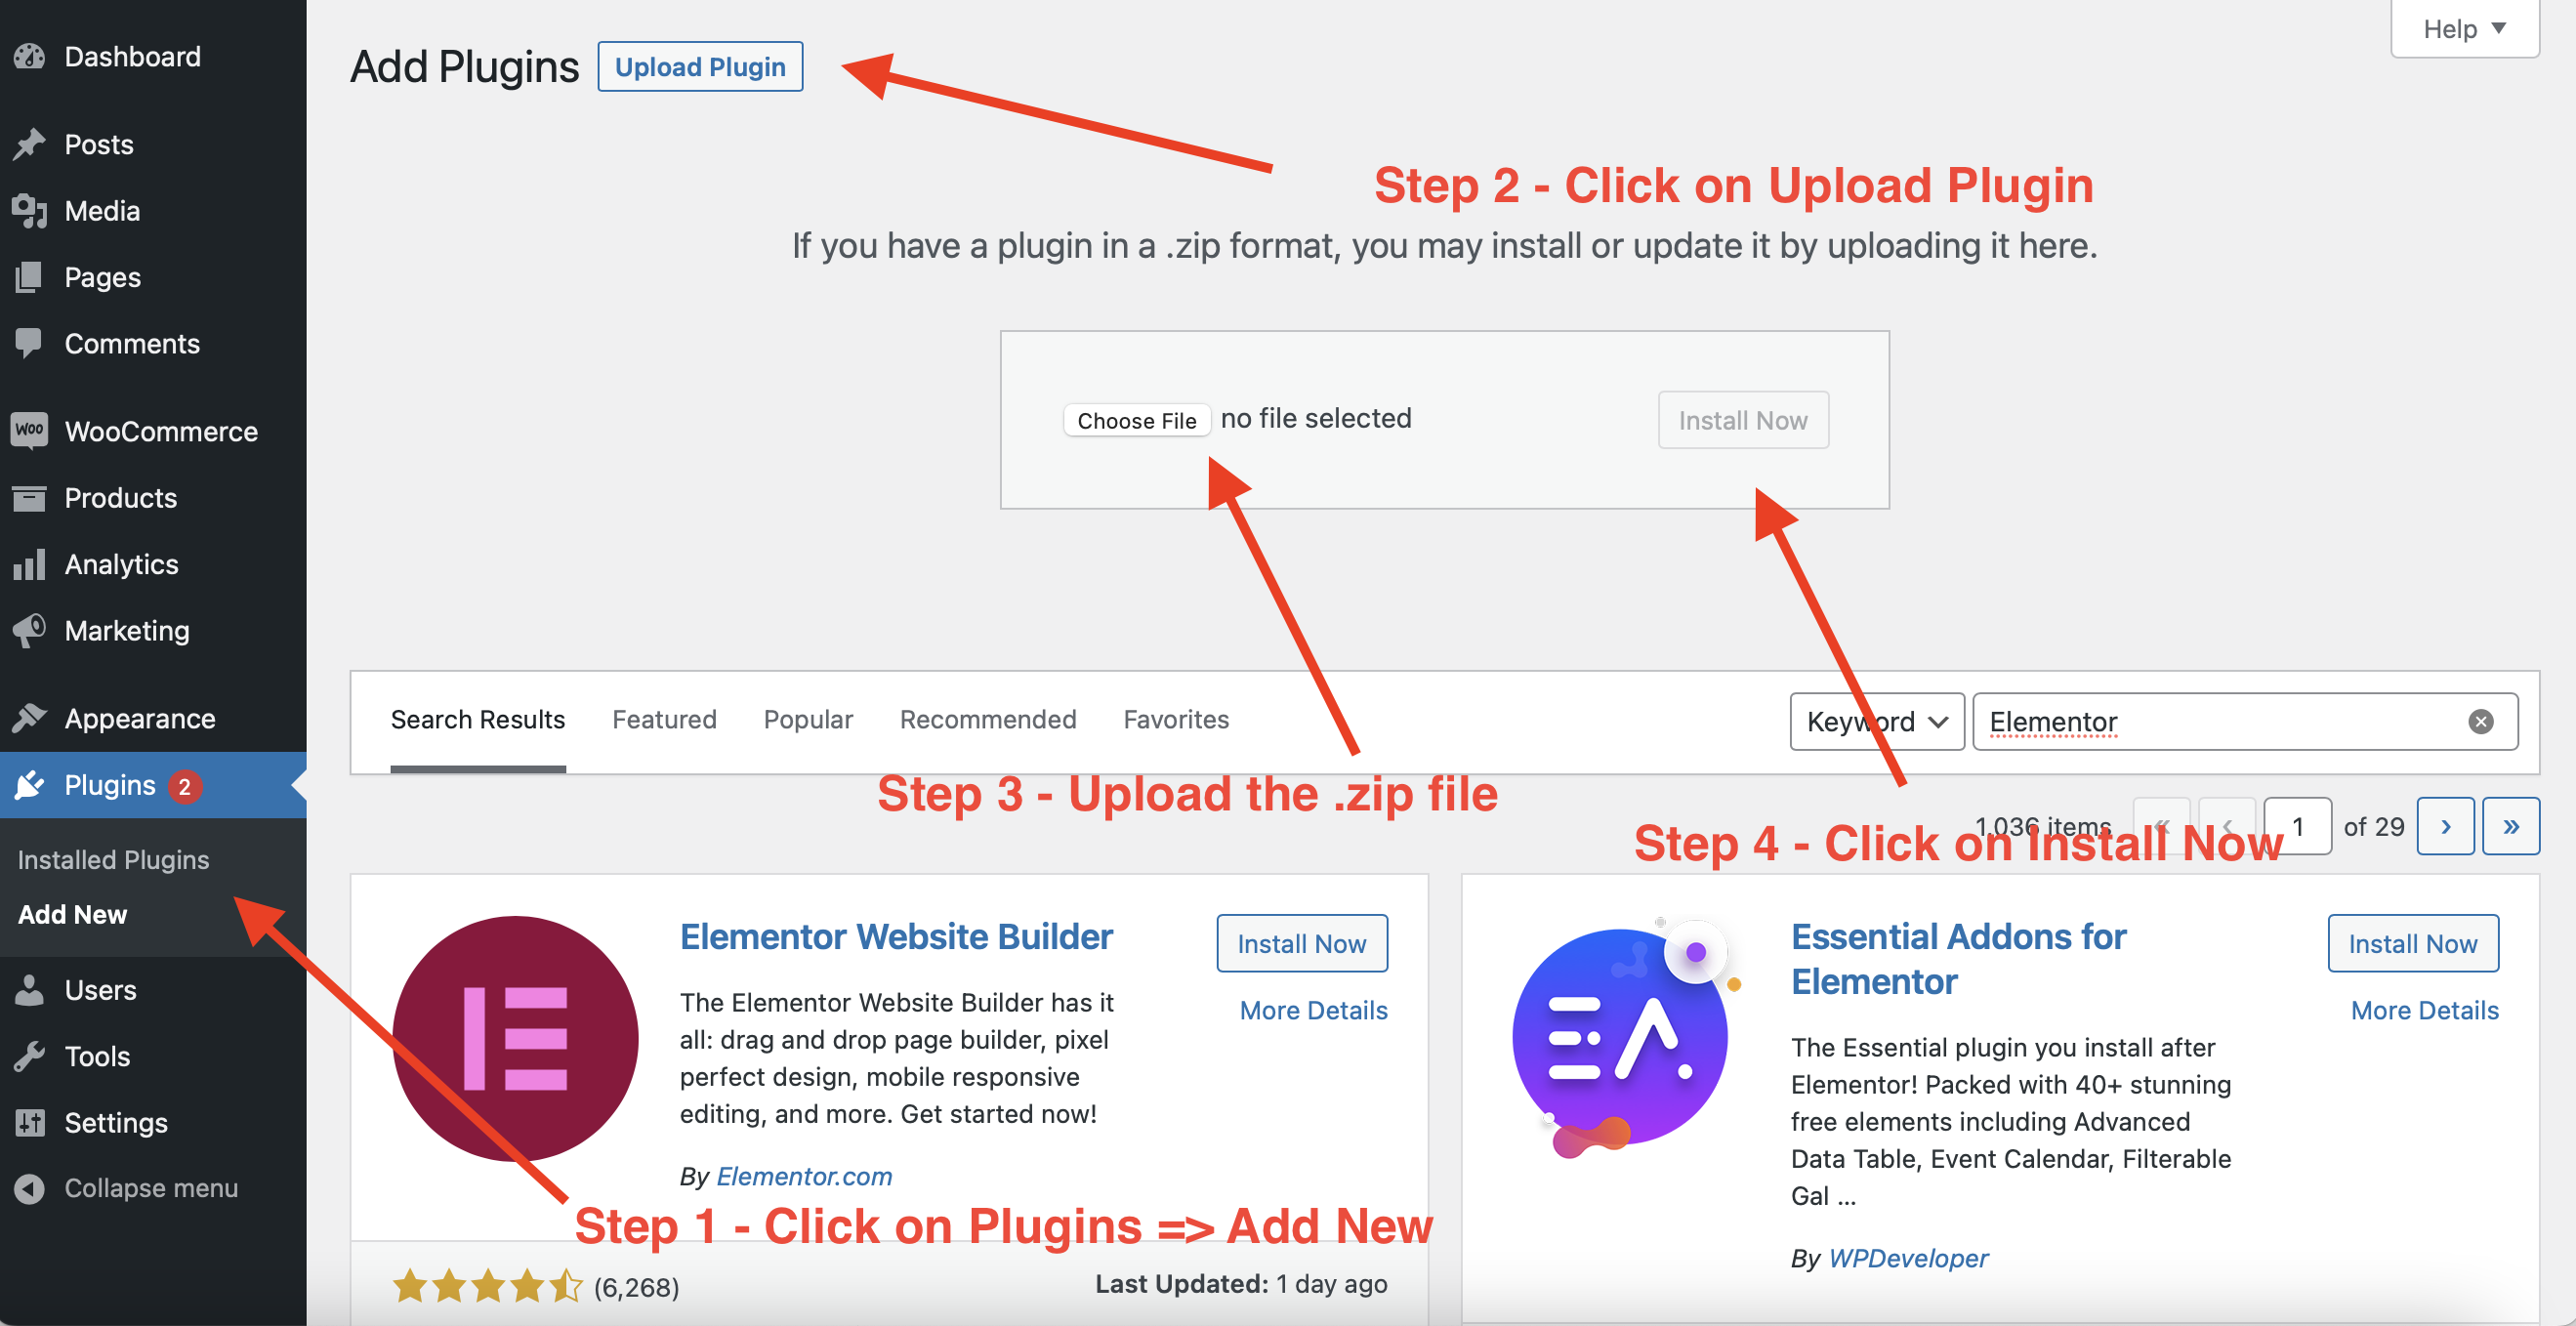
6 – Add the API key that was provided with your purchase of FunnelKit.
Install Elementor
We need the Elementor plugin in order to change the sales pages that are provided by FunnelKit.
1 – Go to Plugins -> Add New
2 – On the search bar, search for Elementor.
3 – Click Install Now and Activate the Elementor plugin.

Install WooCommerce Memberships
1 – After purchasing the WooCommerce Memberships plugin, go ahead and download it to your computer.
2 – Log in to your WordPress website and access the Admin Dashboard.
3 – Go to Plugins -> Add New
4 – Click Upload and attach the zip file that you downloaded from FunnelKit.
5 – Click Activate
6 – Add the API key that was provided with your purchase of WooCommerce Memberships.
Install WooCommerce Subscriptions
1 – After purchasing the WooCommerce Subscriptions plugin, go ahead and download it to your computer.
2 – Log in to your WordPress website and access the Admin Dashboard.
3 – Go to Plugins -> Add New
4 – Click Upload and attach the zip file that you downloaded from FunnelKit.
5 – Click Activate
6 – Add the API key that was provided with your purchase of WooCommerce Subscriptions.
Set up payment processors
Set up Stripe
Stripe is the most popular payment processor out there.
Here’s how you configure it to work with WooCommerce.
1 – First download the WooCommerce Stripe extension from this link
2 – Activate the WooCommerce Stripe extension
3 – Go to WooCommerce => Settings
4 – Click Payments
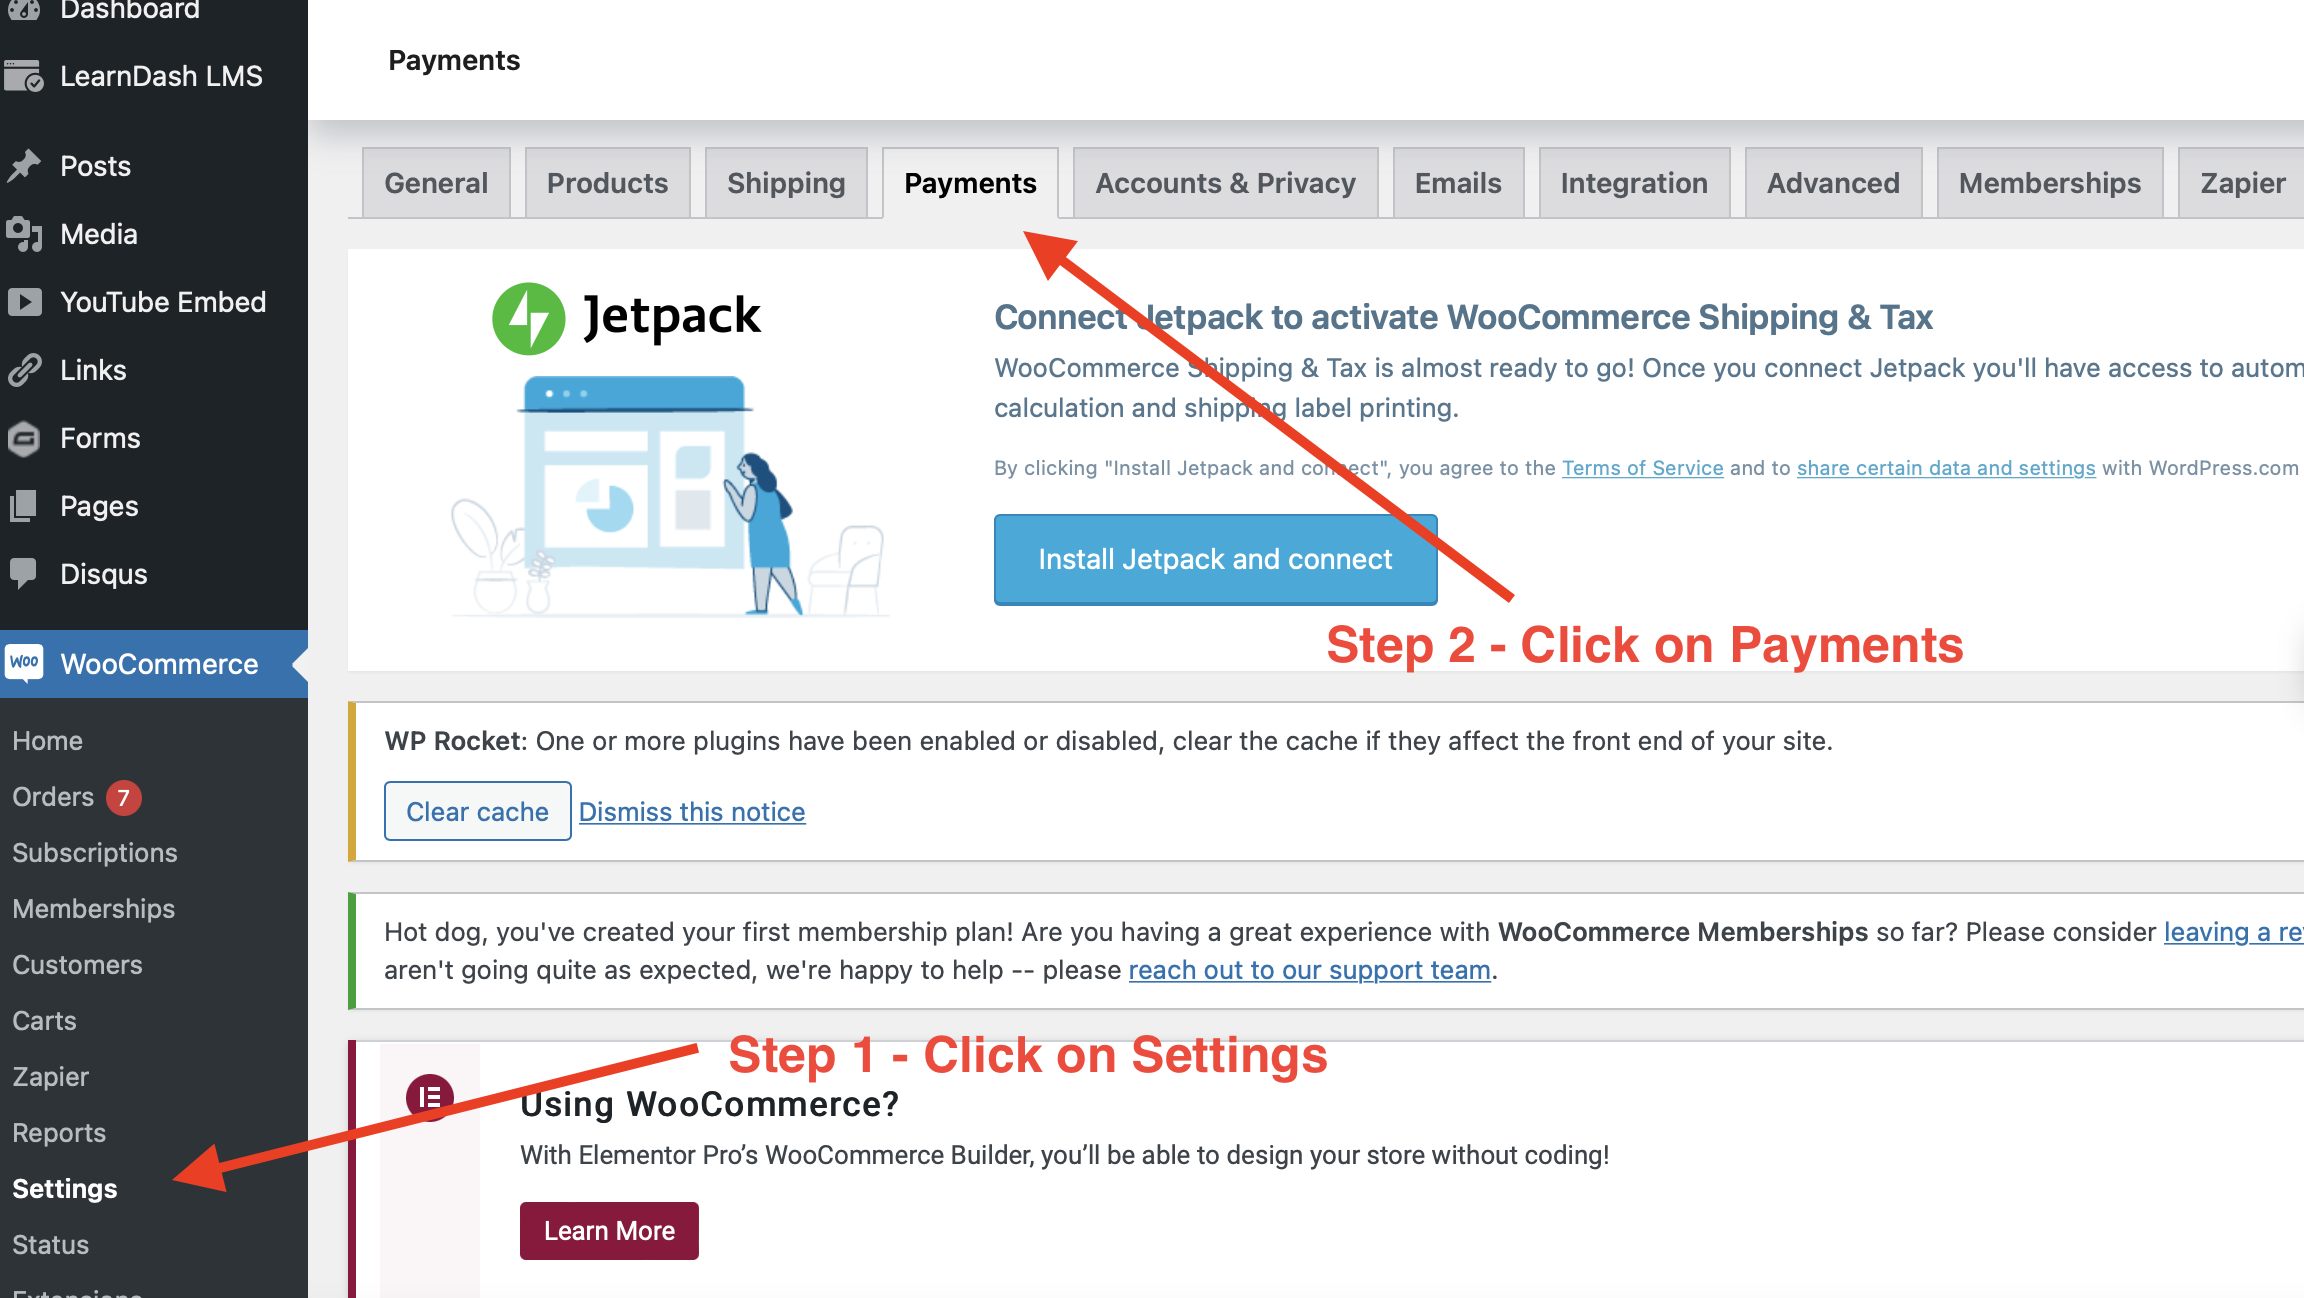
5 – Click on Stripe set-up
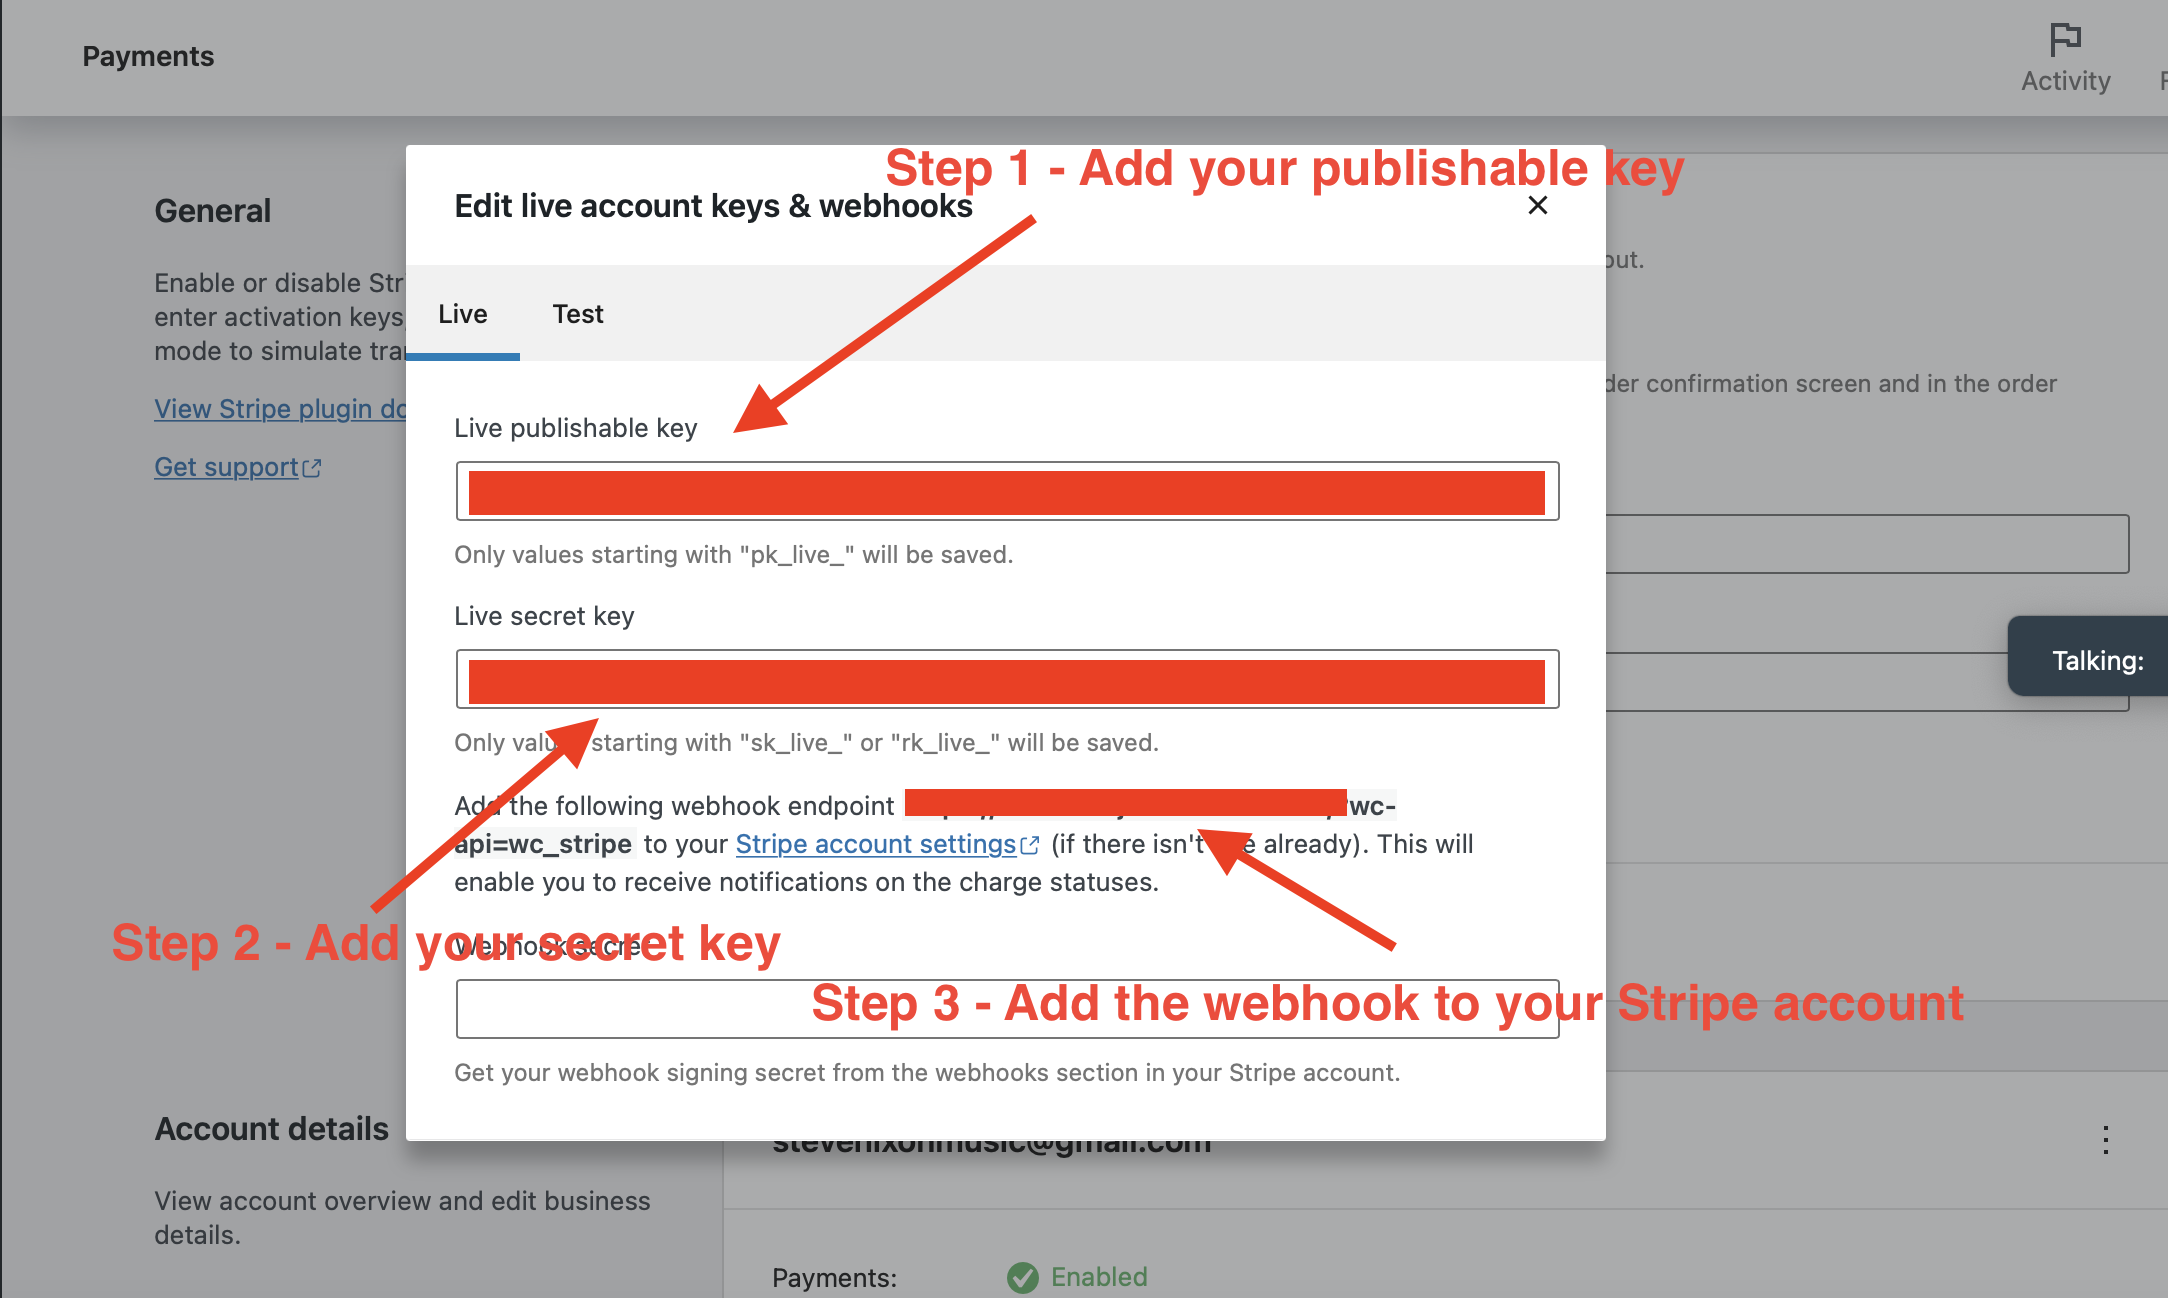
6 – Add your publishable key
7 – Add your secret key
8 – Add the webhook to your Stripe account under Developer settings.
Set up PayPal
Paypal is kind of a pain but it’s still a popular payment processor.
Here’s how you configure it to work with WooCommerce.
1 – First download the WooCommerce PayPal extension from this link
2 – Activate the WooCommerce PayPal extension
3 – Go to WooCommerce => Settings
4 – Click Payments
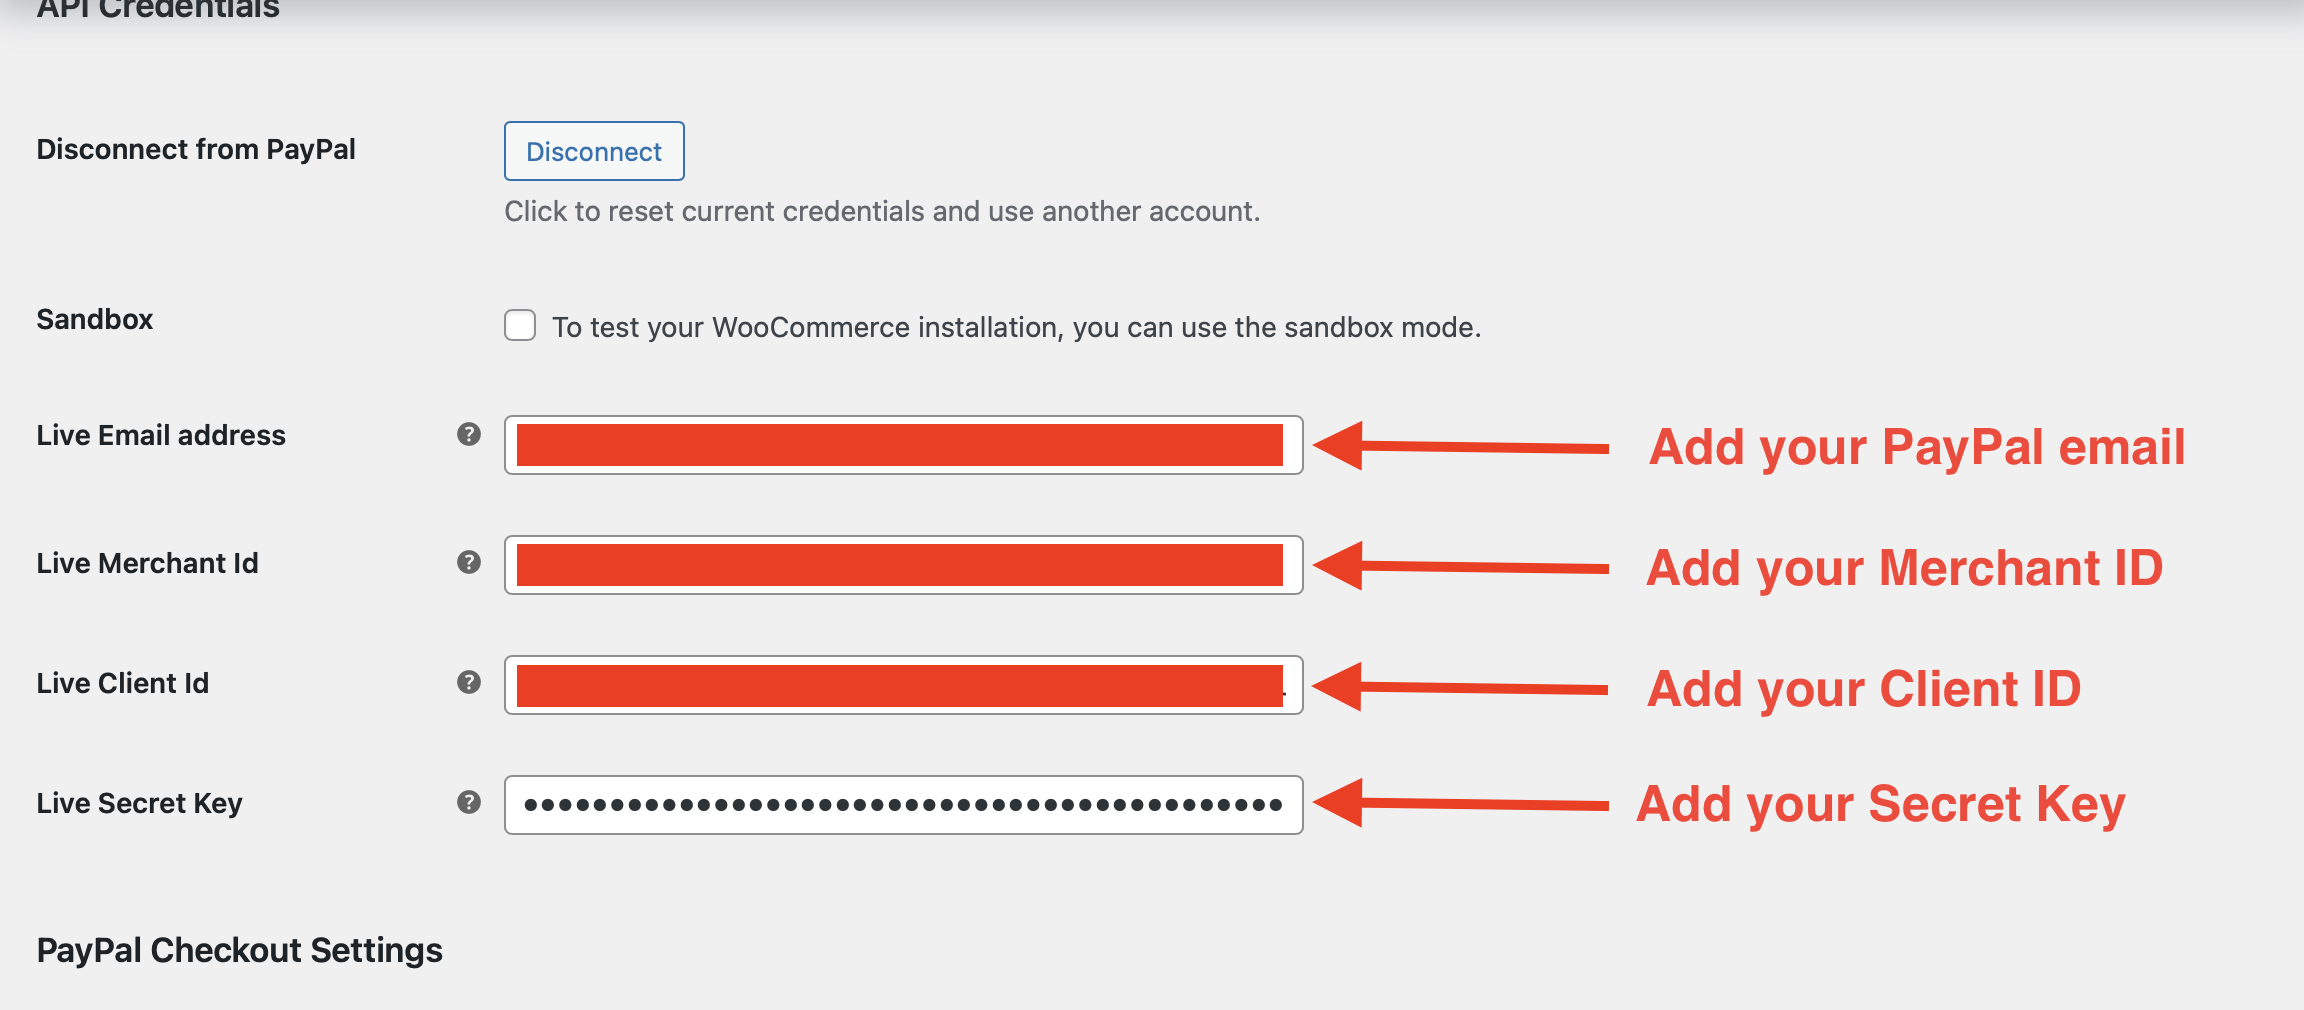
5 – Click on PayPal settings
6 – Add your PayPal email address
7 – Add your PayPal Merchant ID
8 – Add your PayPal Client ID
9 – Add your PayPal Secret Key
Add a WooCommerce Product
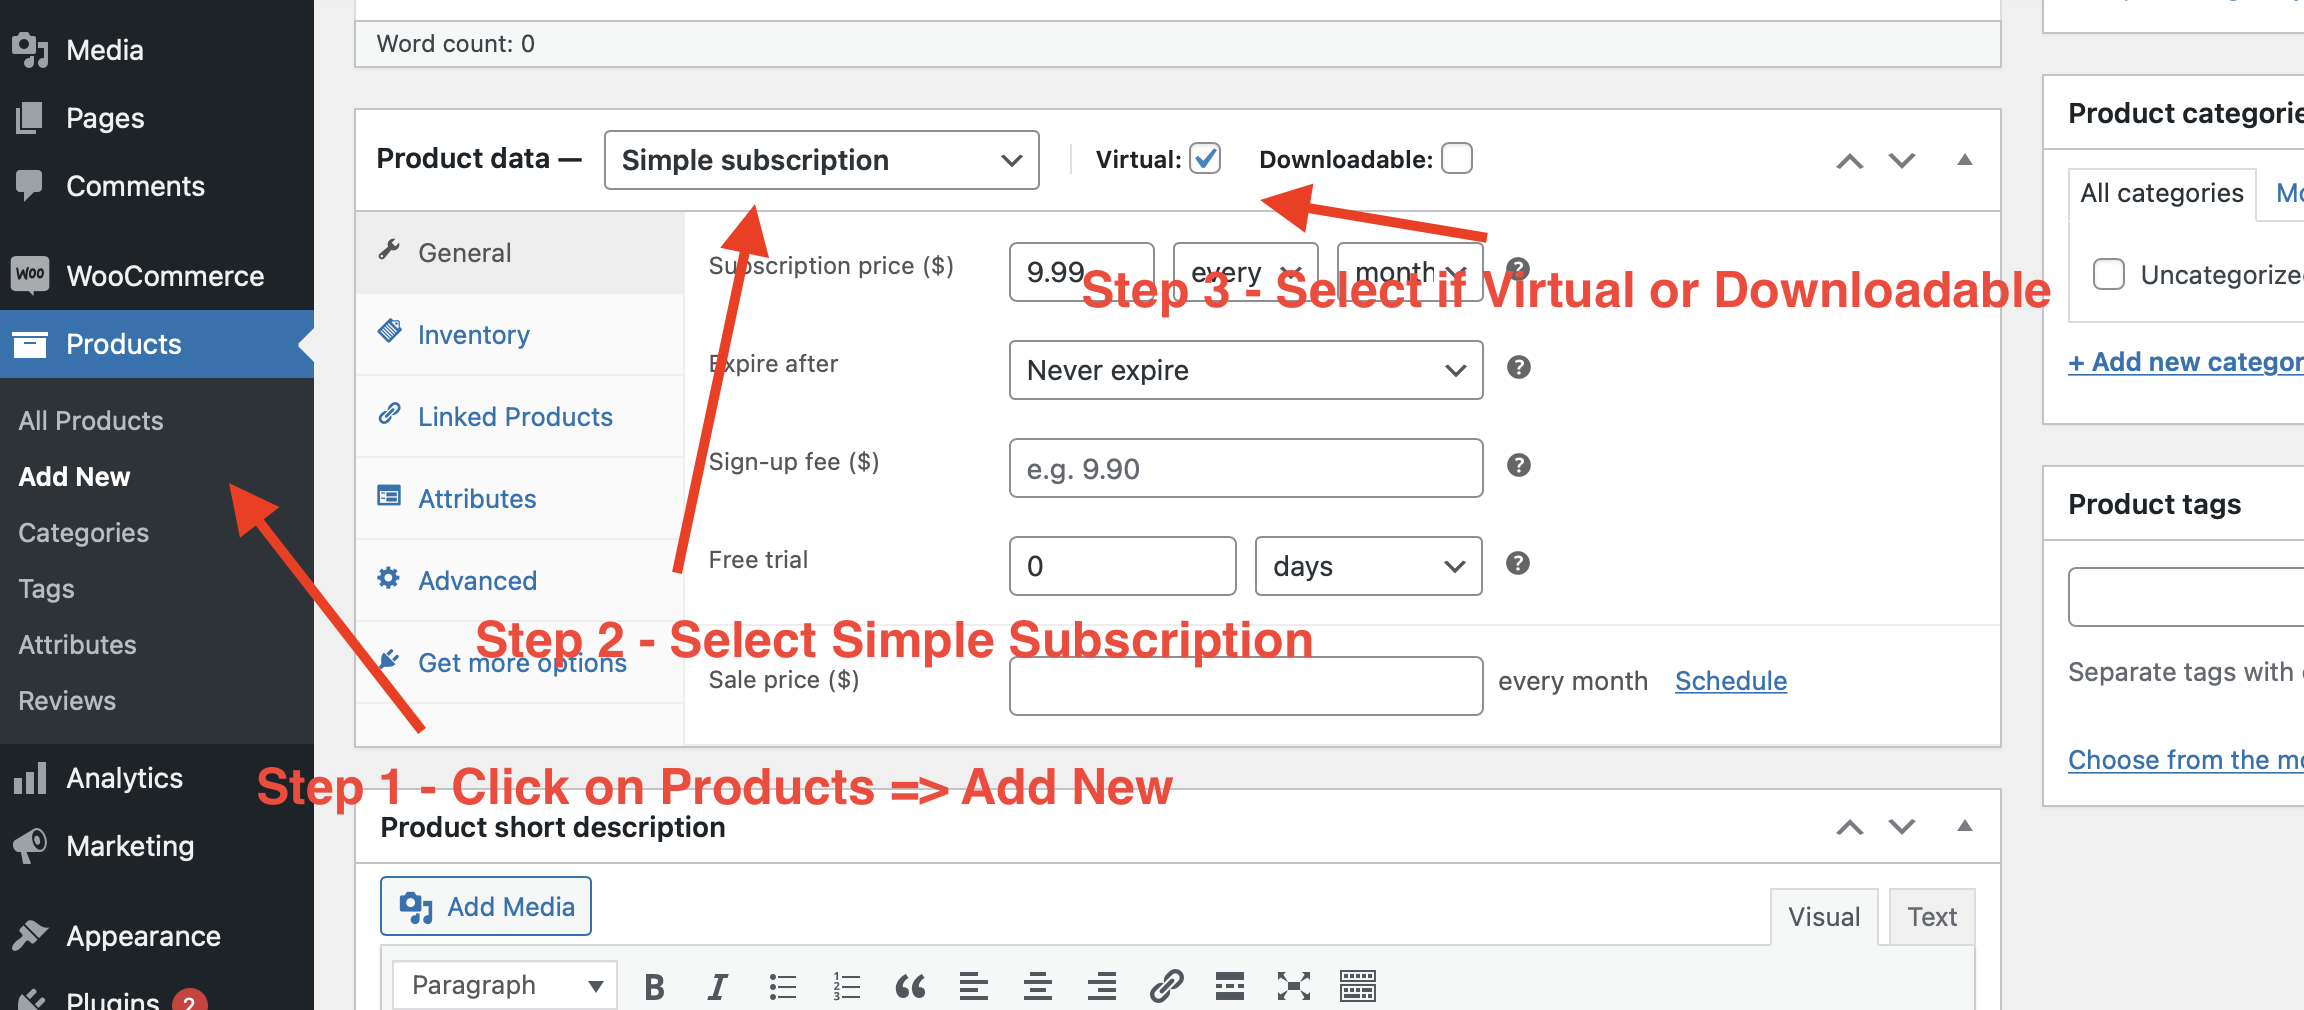
1 – Go to Products => Add New
2 – Scroll down to Product Data
3 – Select Simple subscription from the product types
4 – Select if the product is virtual or downloadable
5 – Add product pricing
Add a WooCommerce Membership level
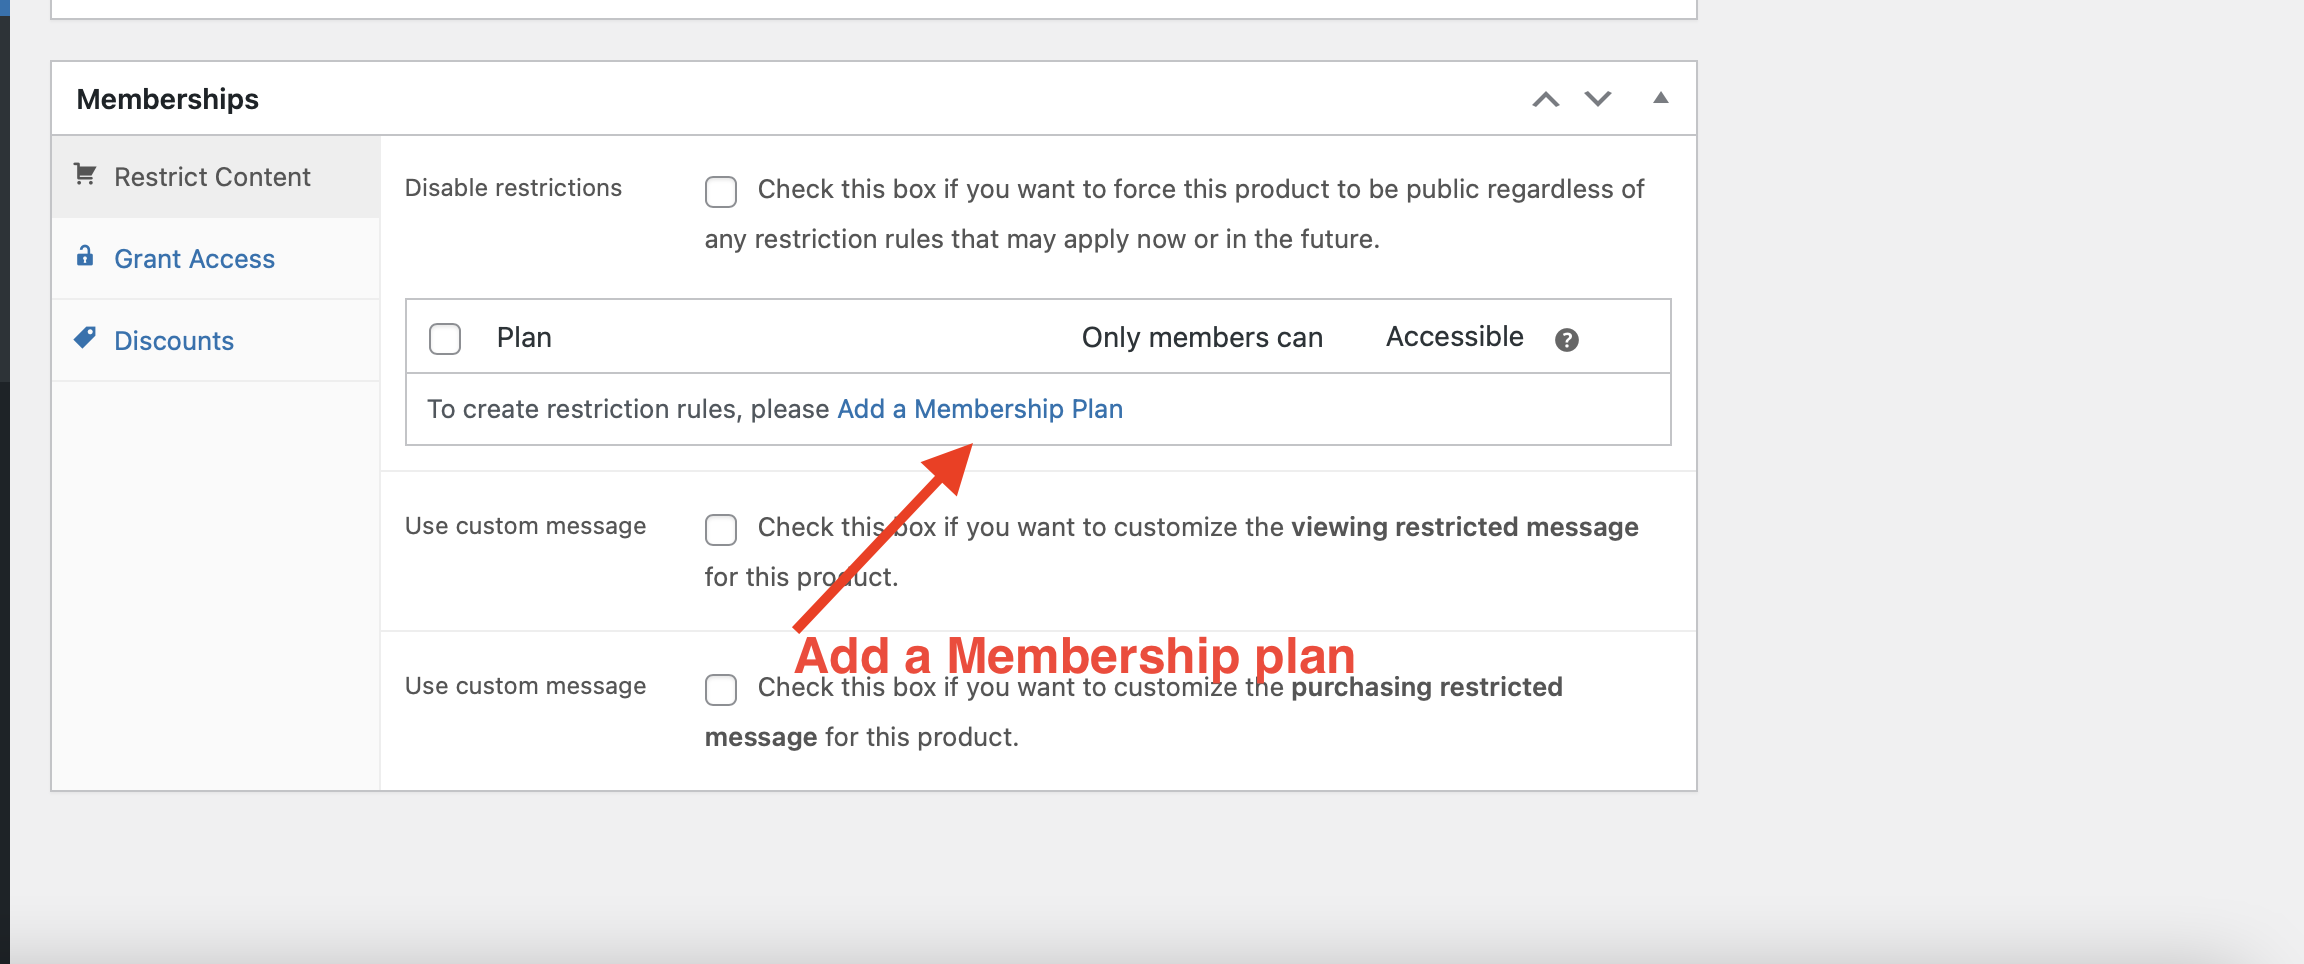
1 – On the same product page scroll all the way down to the Memberships tab.
2 – Click on Add a membership plan
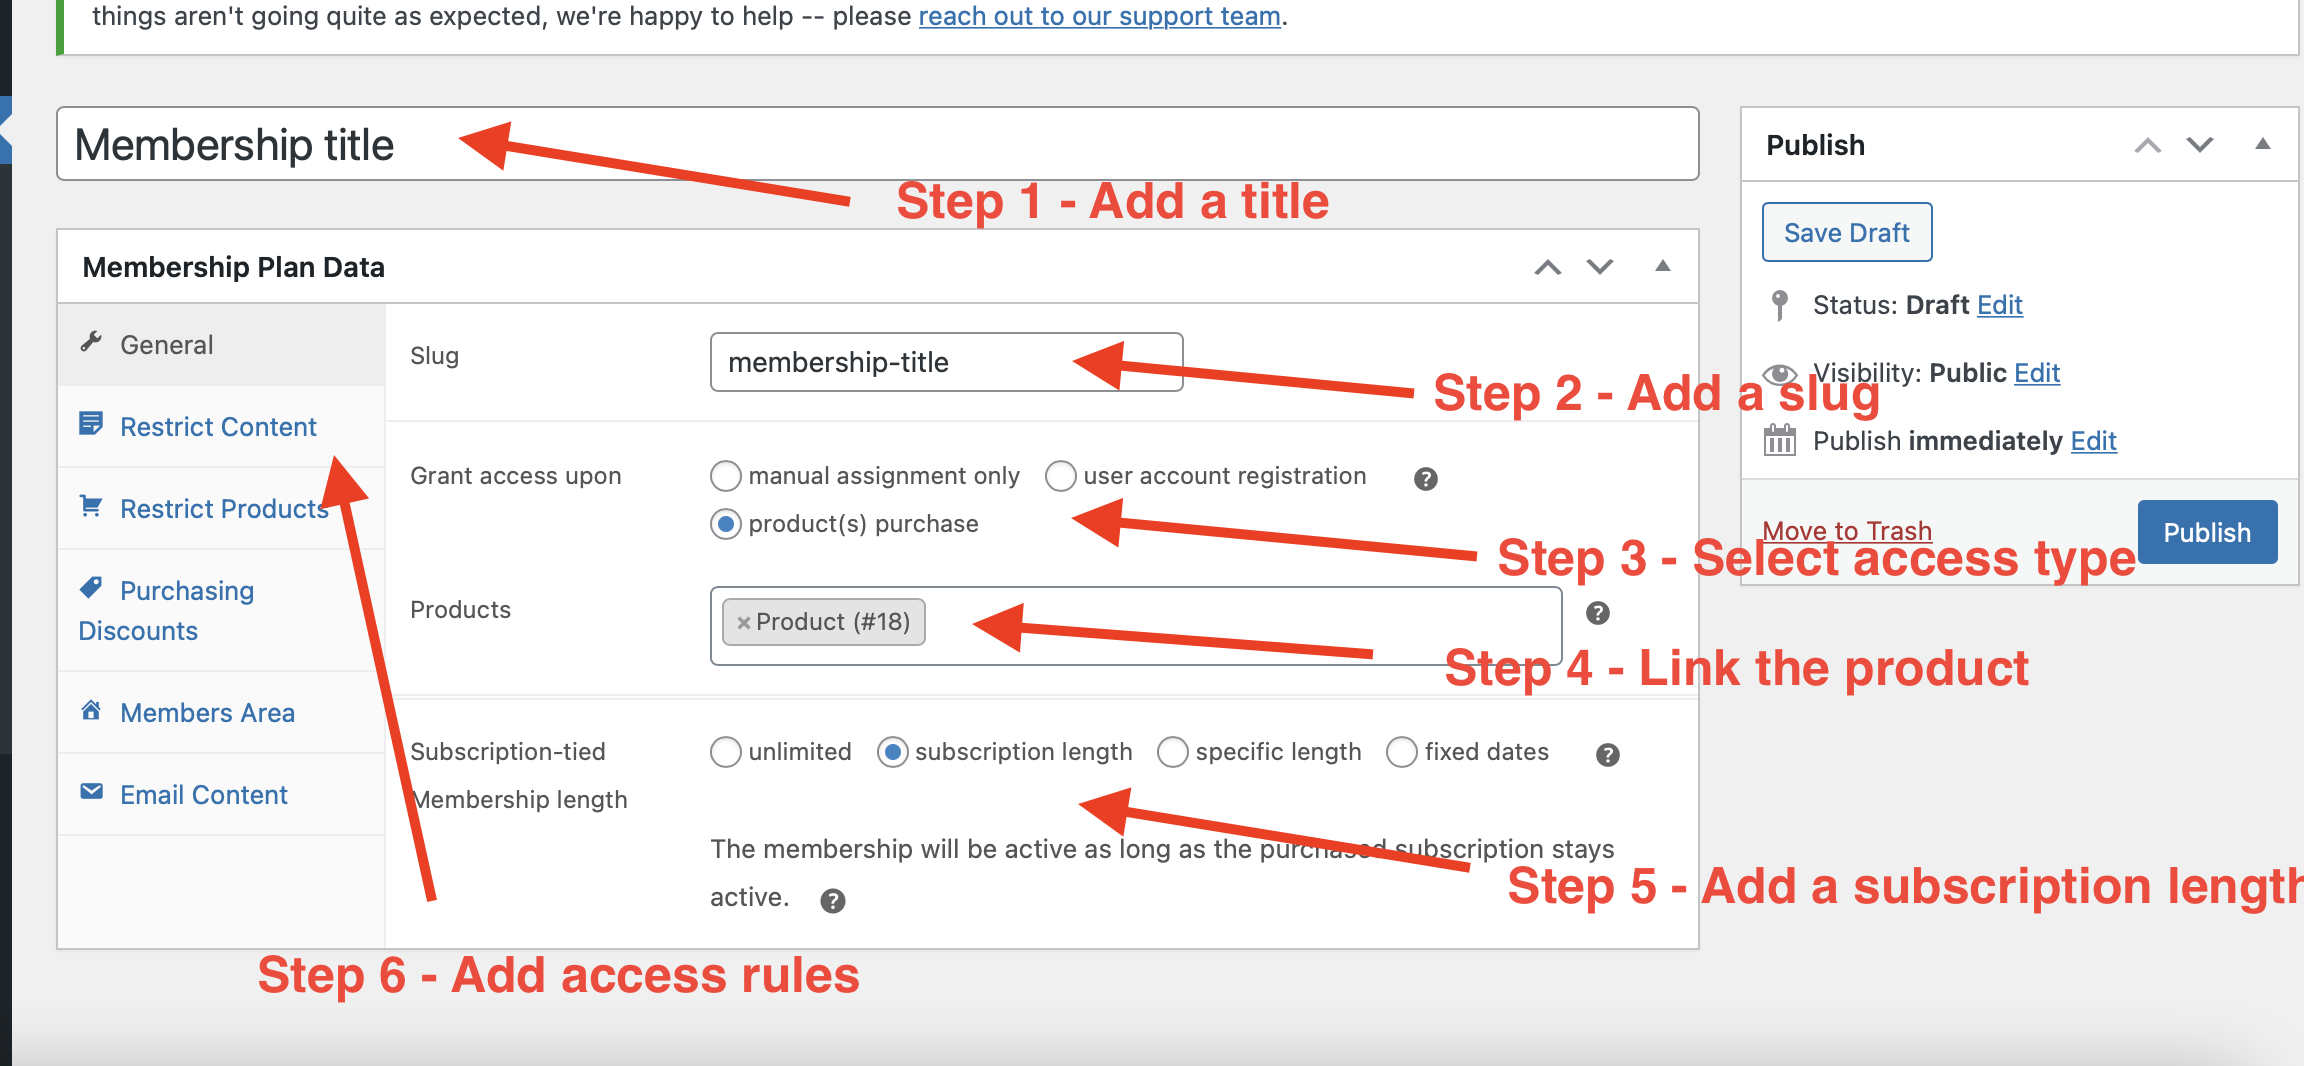
3 – Add a Membership title
4 – Add a slug
5 – Select grant access upon: product purchase
6 – Select subscription length on subscription tied Membership length
7 – Add access rules for your Membership
Create a funnel in FunnelKit
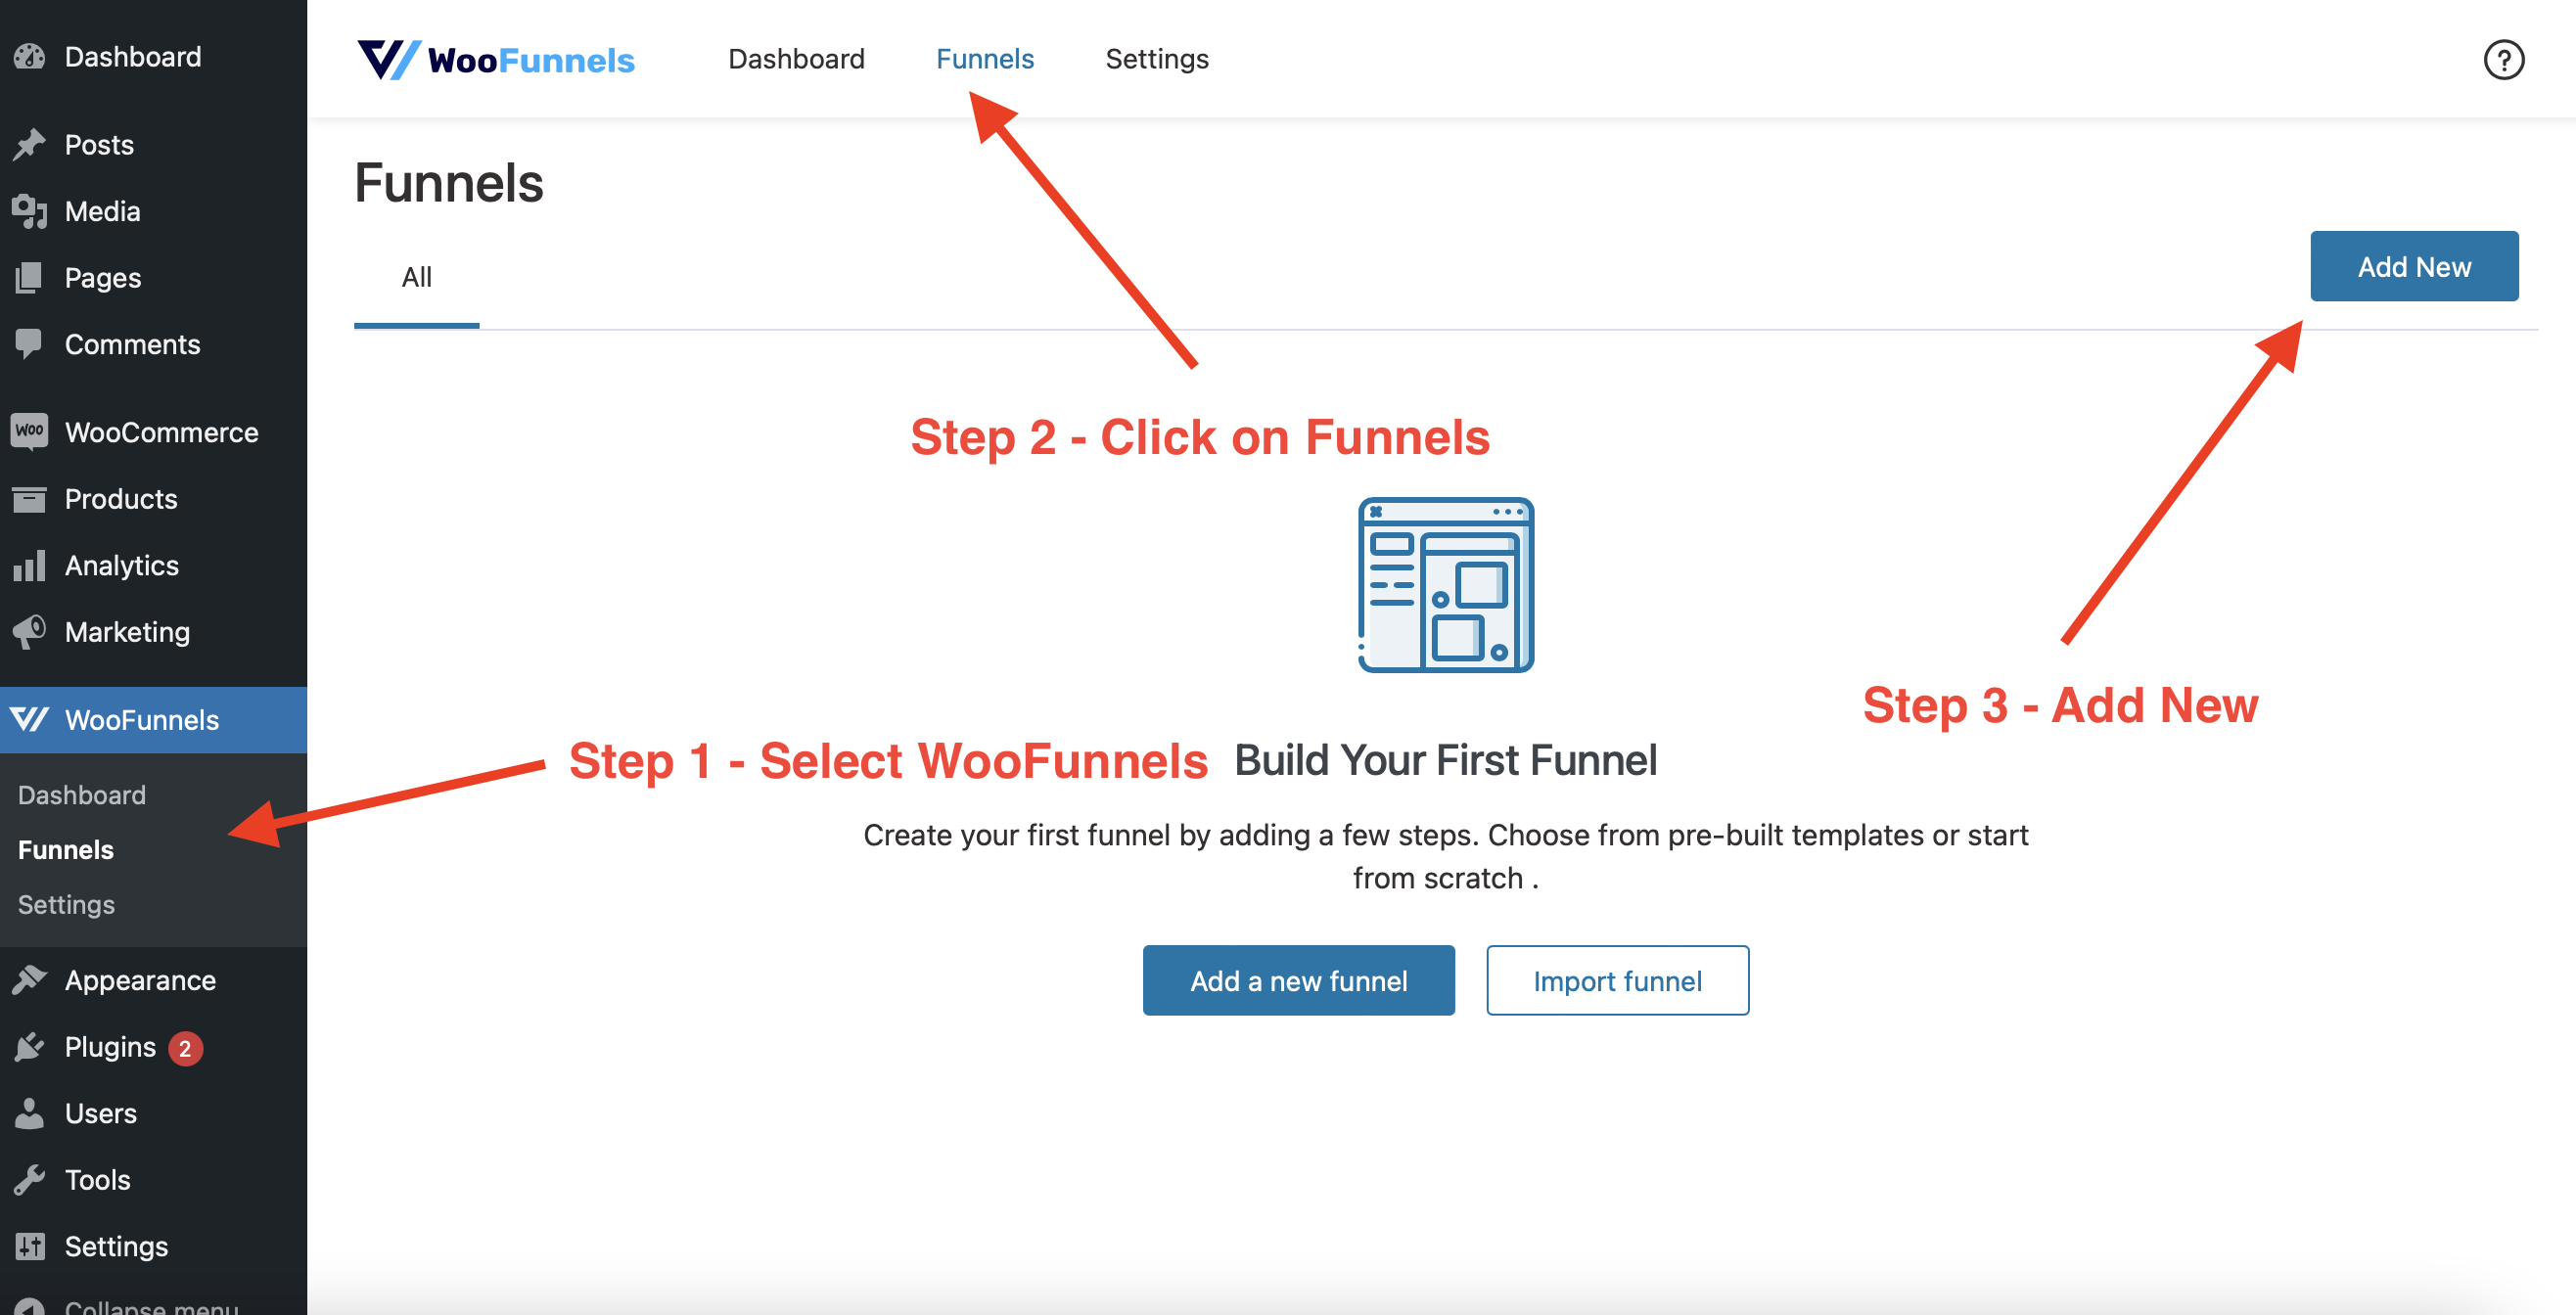
1 – Go to FunnelKit
2 – Select Funnels
3 – Click on Add New
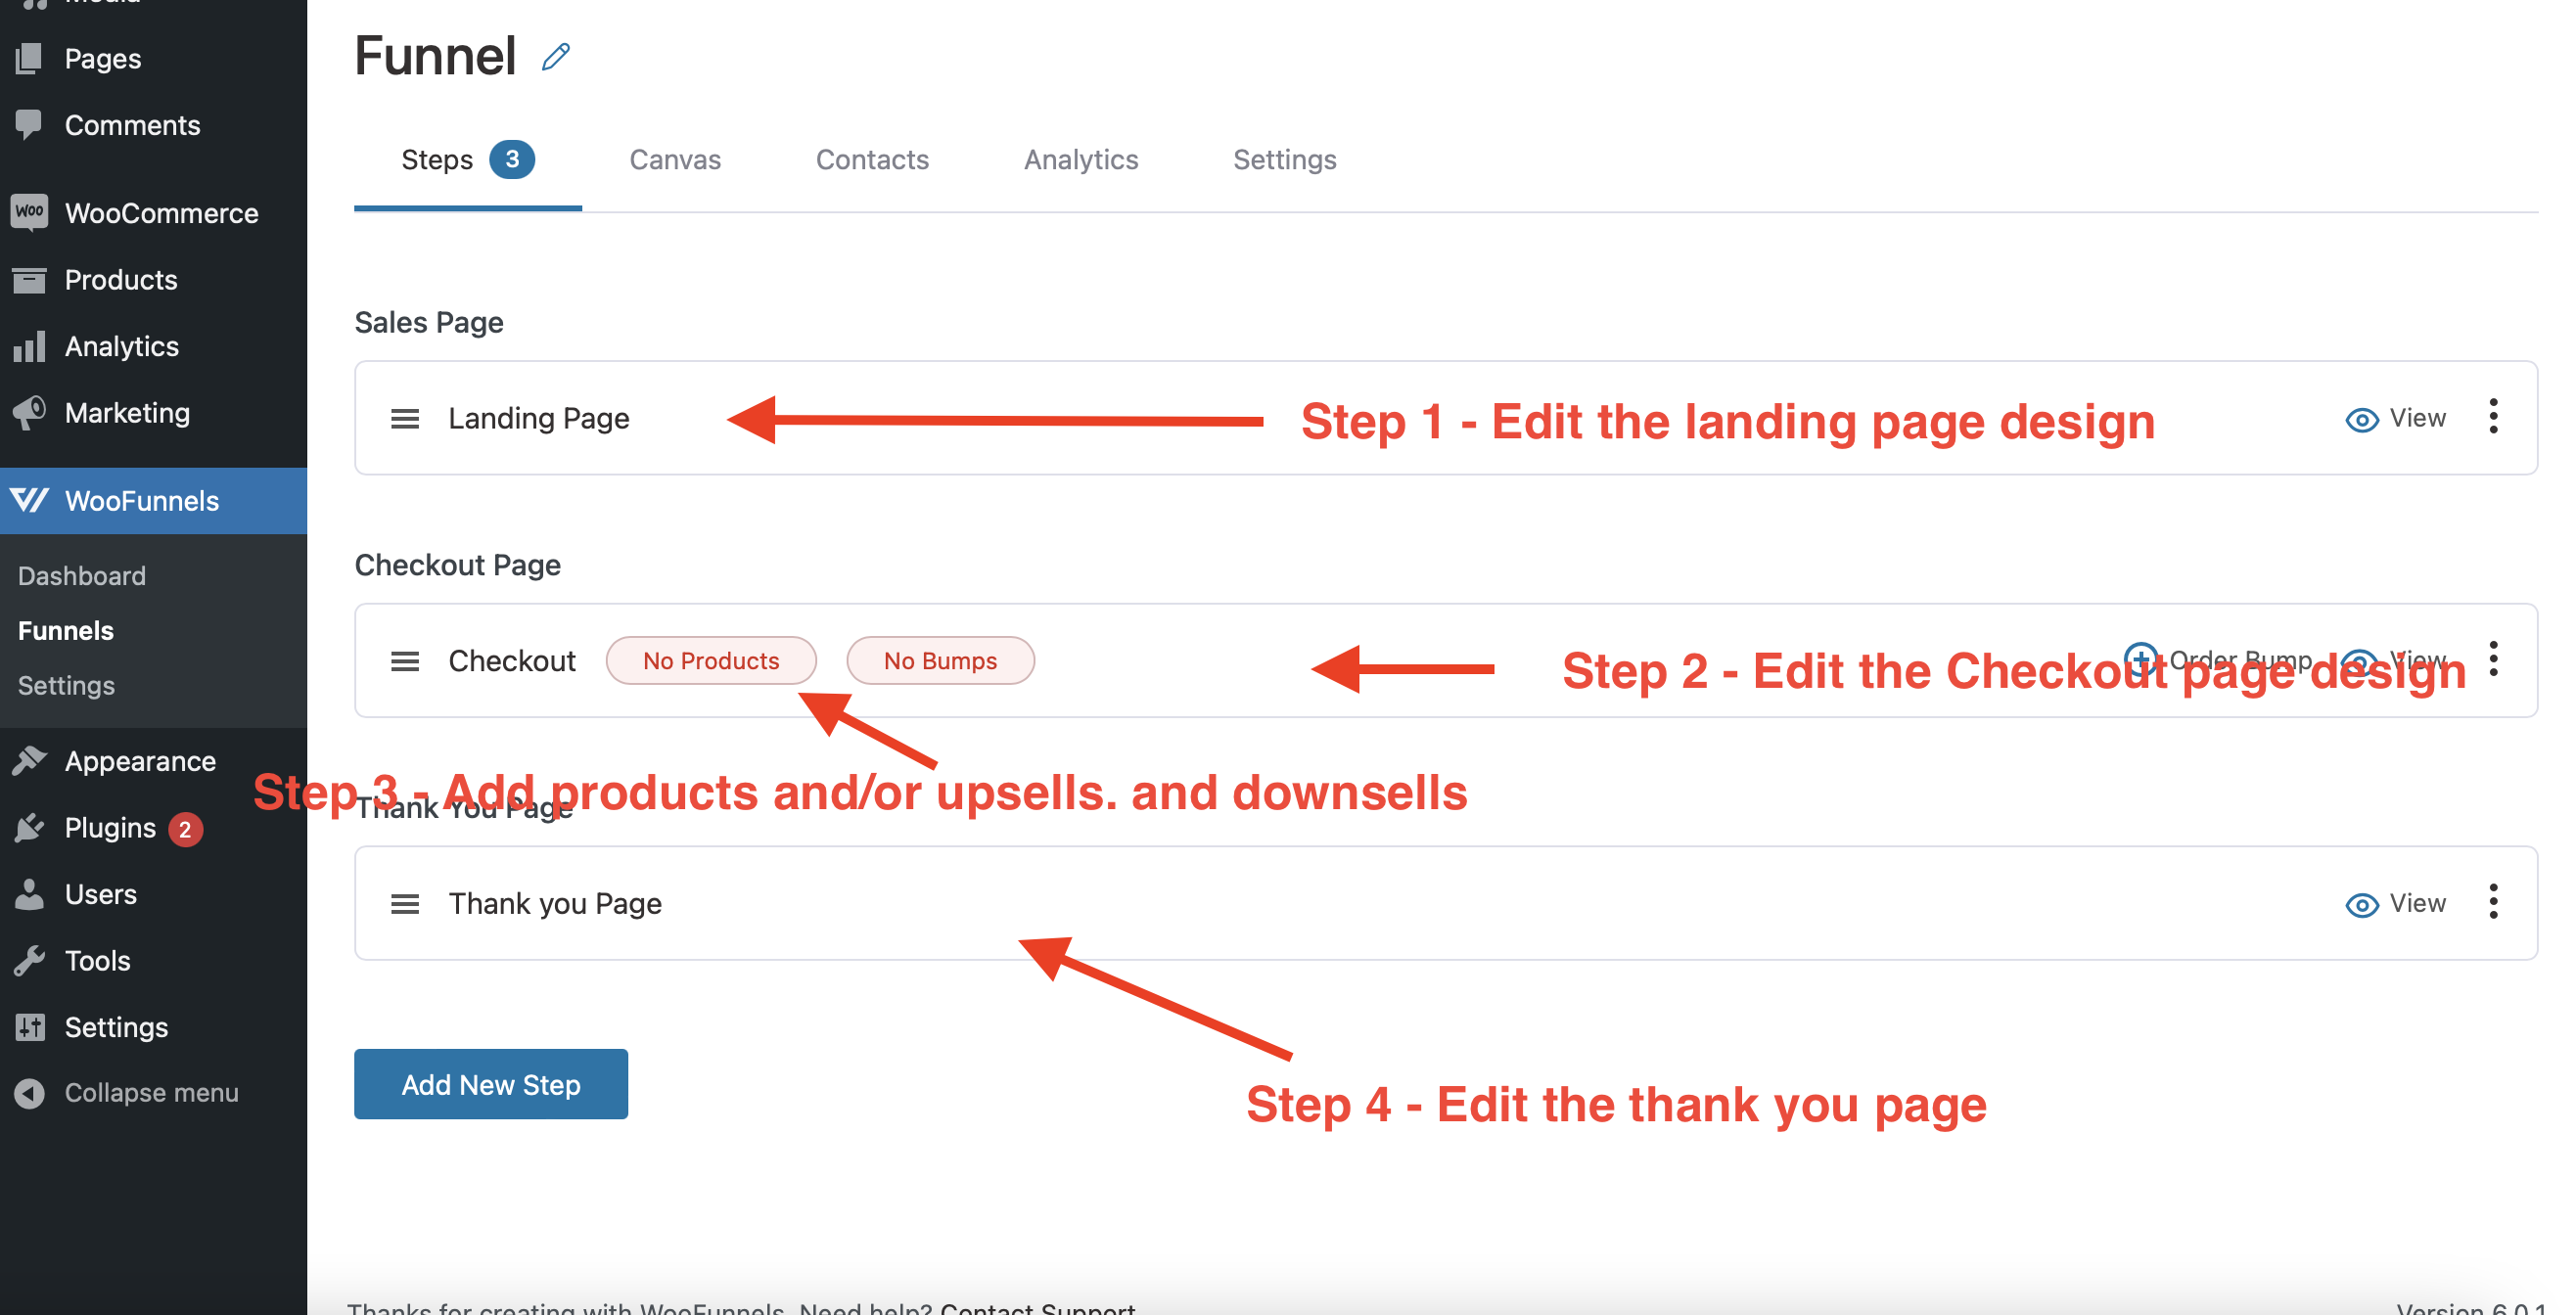
4 – Click on Import on any of the styles and start editing the pages in Elementor
5 – Edit the landing page design
6 – Edit the Checkout page design
7 – *Important: Always link your products with the checkout pages. Add all relevant products, bumps, upsells or downsells.
8 – Edit the thank you page
Conclusion
With everything installed and set-up, you now have a WooCommerce website ready to:
- Sell memberships
- Accept subscription payments with Stripe and Paypal
- Create funnels, including upsells, downsells, and order bumps.
With customized checkout forms, bump offers and thank you pages, your website will look unique and will not have that “generic” eCommerce store look.
And it will convert a lot better than a boring registration or checkout form.
Need help setting this up?
We can help!
Just contact us—and let us know how we can assist you.