I've created a free spreadsheet tool that allows you to enter in several columns of your members' data and output the data in the format accepted by the Digital Access Pass (DAP) bulk-add multiple users feature.
*This tool is for ‘simple' import only (email, first name, last name, username). If you need to import more user data than that, check out this doc.
**DAP uses each member's email as his login ID, so there's no need to import or create usernames. They're totally optional.
==> Click Here To Access The Free Format Converter <==
To use the tool:
1. Click the link above
2. Click on File => Make a copy…
Now you'll be able to edit the file and enter in data.
3. Follow the directions inside the spreadsheet.
4. Once you've generated column E, select the column starting from E6 all the way down and copy the data to your clipboard.
5. Go to DAP => Users => Add => Bulk-Add Multiple Users To A Product
6. Select the product to which you'd like these users to be added.
*Important Note!
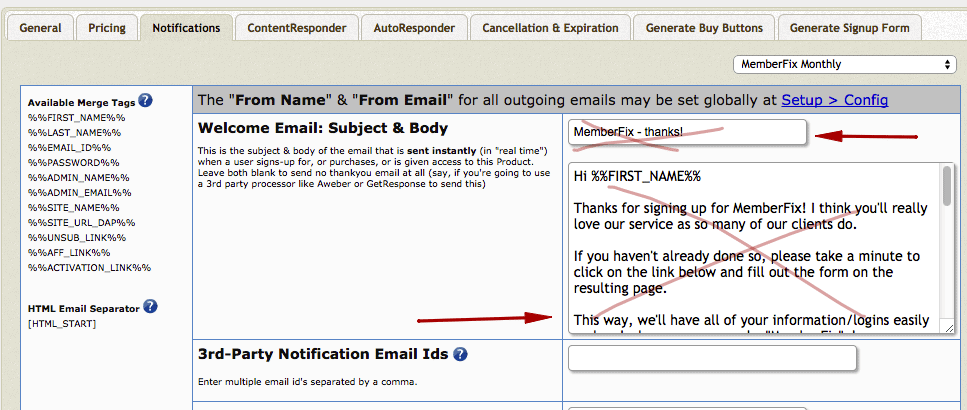
If you're doing a “silent” import of members and do not want them to be sent any kind of welcome email upon being imported, then go to DAP => Products => Manage, select the product in question, go to the Notifications tab and delete the welcome email subject and body:

If you do want to send out a welcome email right away, then simply fill in these fields with your welcome email copy.
7. Go back to DAP => Users => Add => Bulk-Add Multiple Users To A Product.
8. Paste the DAP-formatted row of members into the box.
If you want to mark the users as ‘paid' in DAP, tick the ‘Mark Users As Paid' checkbox.
9. Click the ‘Bulk Add Users' button.
10. Usually you'd have to wait until the top of the hour when the DAP cron job runs on your server in order for this import to proceed.
But you can immediately import your members by manually running the cron job.
Simply visit http://yoursite.com/dap/dap-cron.php
(replace yoursite with your actual website URL).
11. Have a beer. 🙂


