Before you spend your hard earned money on a full-fledged affiliate plugin that integrates with MemberMouse, it behooves you to find out whether or not a referral program is even a viable marketing channel for you.
One of our MemberFix It customers recently asked us to help him do exactly that. So we figured out a way to use MemberMouse's native functionality (along with a few code snippets) to implement a low-tech affiliate program without spending another dime.
So without further ado, here's the step by step guide to implementing your own low-tech, low-budget affiliate program using just MemberMouse and a few lines of code:
1 – Create a new custom field called Affiliate ID.
To do this go to MemberMouse => Checkout Settings => Custom Fields and click “Create Custom Field”.
2 – Fill out the custom field like so:
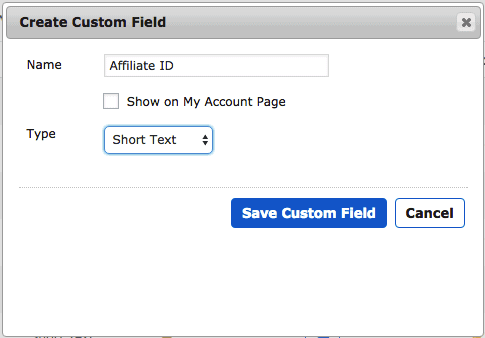
Name: Affiliate ID
Show on my account page: leave unticked
Type: Short text
*Make a note of the ID number of your new custom field by hovering your mouse over it as shown in the animated GIF below; you're going to need it in a minute.
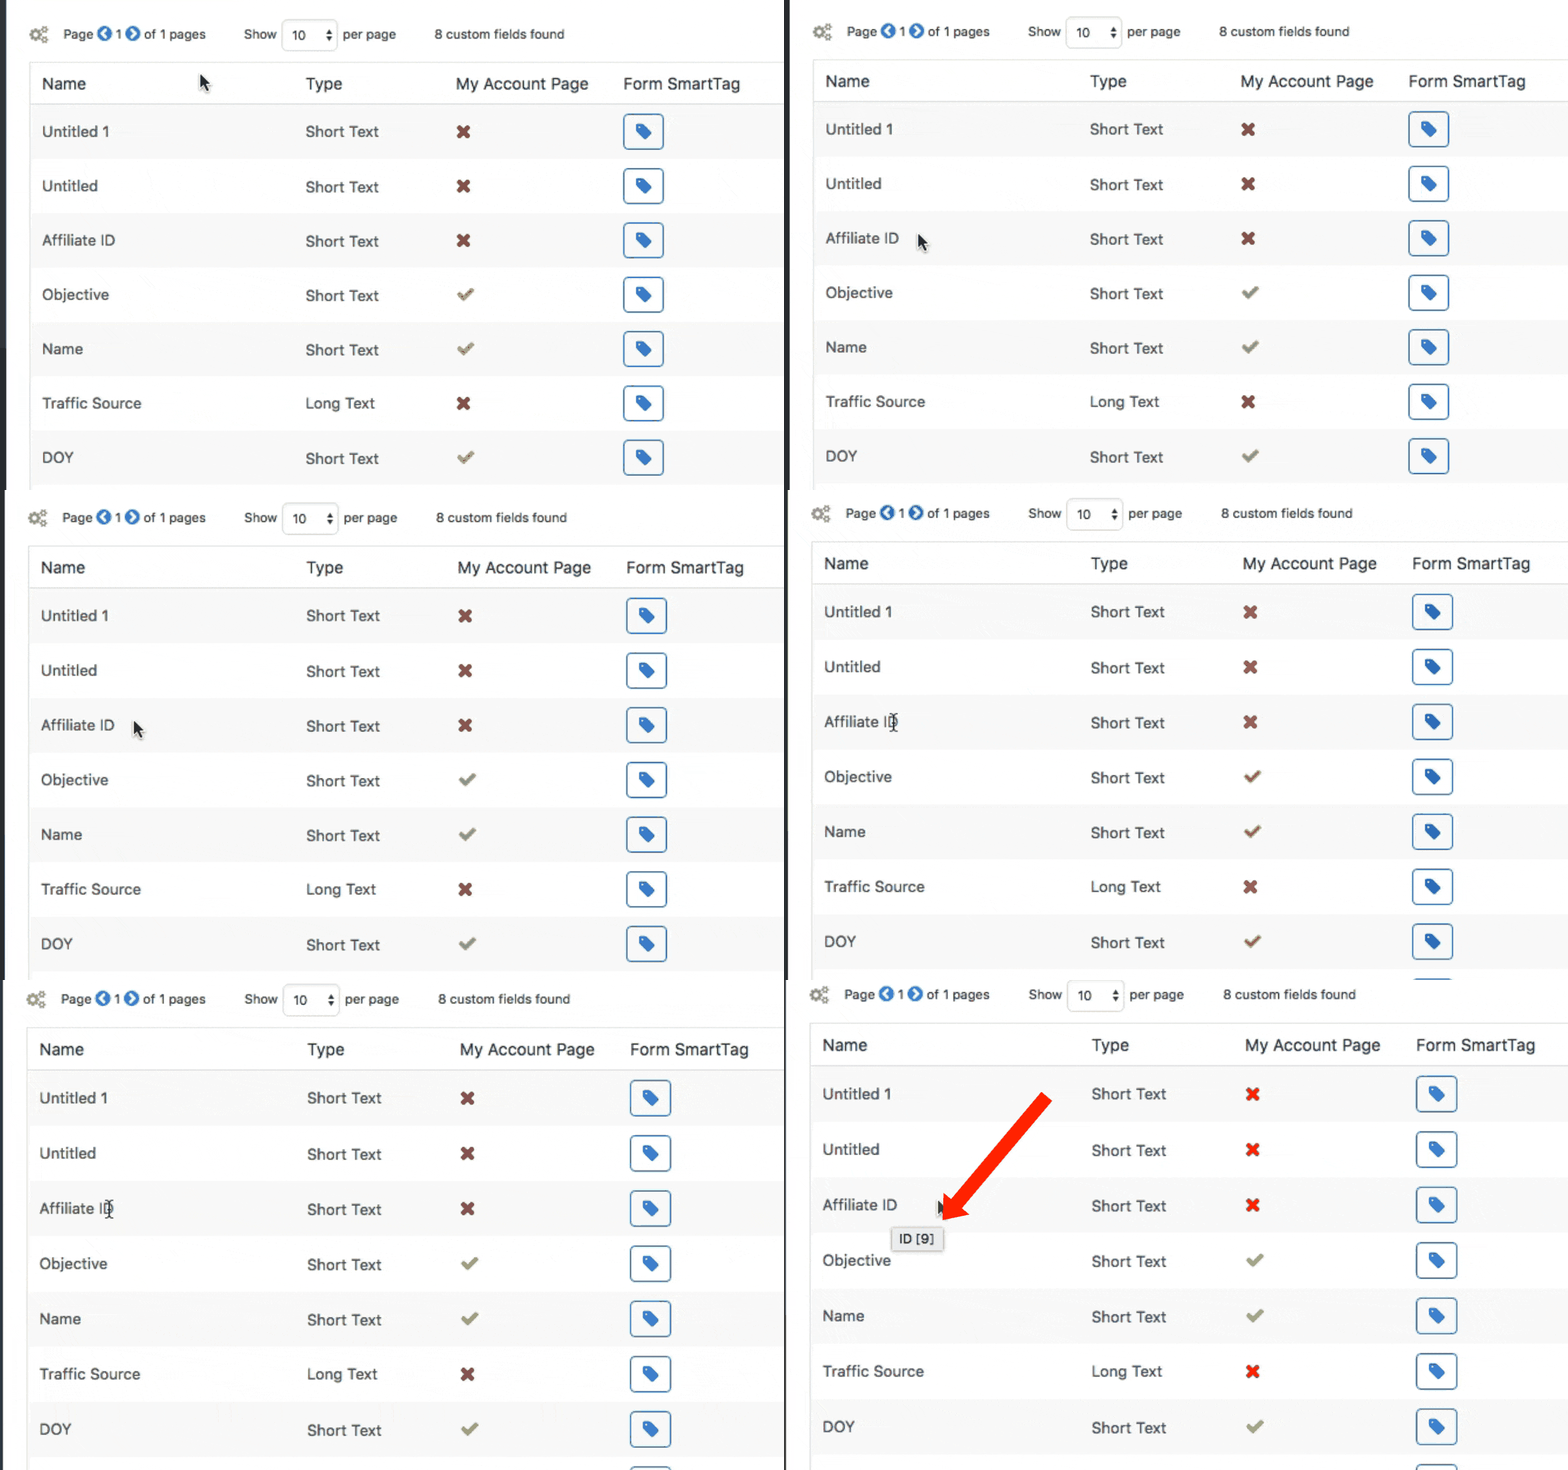
3 – Assign an affiliate ID to all of your affiliates.
The affiliate ID is a totally arbitrary value. It can be any combination of letters and numbers. I recommend you use either integers or names (lowercase and without spaces) to keep things simple and error-free.
To keep track of this, I created a small Airtable base. Feel free to use it and adapt it to your needs:
4 – Copy the following shortcode to your clipboard:
IMPORTANT: Make sure to replace the number ‘9' with your custom field number from step #2 above!
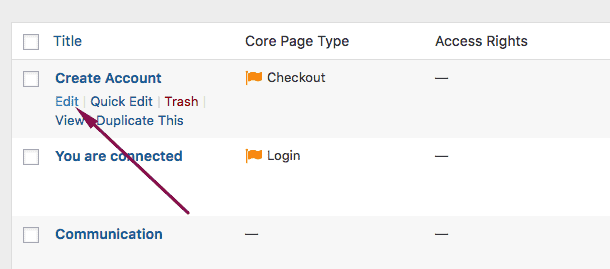
5 – Visit your MemberMouse checkout form page and open it in the WordPress editor.
6 – Paste the shortcode from step #4 immediately after the payment button shortcode towards the end of the checkout form template, like so:
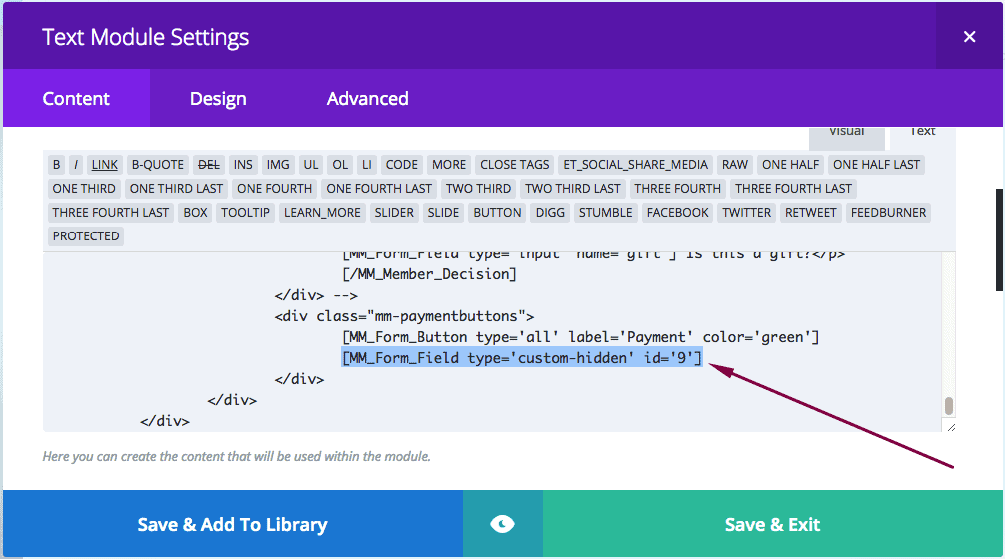
*Note: if you have several active MemberMouse checkout forms, make sure to add this hidden custom field to ALL of them.
**And if you have several hidden fields that you want to populate, simply repeat this step as needed and change the custom field ID number for each additional field you add.
7 – Now, in order to actually populate the hidden custom field with your affiliate's ID number, your affiliate partner will need to pass the custom field value in the URL query string, like so:
https://www.yoursite.com/?cf_9=vicdorfman
In the above checkout link, notice the text in bold. It's written in the format “cf_x=y”, where ‘x' is the custom field ID number from step #2, and ‘y' is the affiliate's ID. Since we're already using a number to identify the custom field ID, I used my name as the affiliate ID.
Using this checkout link as an example, you can deduce that the ID number of the custom field I created in MemberMouse is 9, and the ID of the affiliate is vicdorfman.
Using another example, if your custom field ID number is 13, and your affiliate's ID is johnwayne, then the entire MemberMouse checkout link would like like this:
https://www.yoursite.com/checkout/?rid=pl1Ri7&cf_13=johnwayne
The custom field value will always be a number but your affiliate ID can be whatever alphanumeric value you want it to be. Note that the custom field value in the URL query string has to follow the same syntax rules as any other parameter you pass via the URL.
8 – Now whenever an affiliate wants to send referral traffic to your site, all he has to do is include the custom field and his affiliate ID in the URL.
The problem at this point, however, is that the affiliate can only send traffic directly to a checkout page. If the customer buys your offer straight away without visiting any other pages, the affiliate's ID will be recorded in the custom field. But if the customer leaves the checkout page and comes back later, the affiliate ID will be gone.
So to solve this issue, we're going to place the affiliate ID value in a browser cookie! And luckily, there's a WordPress plugin that does exactly that. It's called Cookie Monster.
Let's go ahead and install it.

9 – Go to WordPress => Plugins => Add New and search the WordPress plugin repository for the Cookie Monster plugin.
Install and activate it.
10 – Go to WordPress => Settings => CookieMonster.

Use the following values:
URL Parameter 1 (A): Your custom field parameter (make sure to replace '13' with YOUR custom field ID number from step #2)
Defaults to (B): Leave this blank
Cookie duration: This can be whatever you want. I set it to 9999 days but you can set it to 30, 60, etc.
Click Update Options.
This setting ensures that when somebody visits your site with the custom field parameter set in the URL query string, it will record that value in a cookie in the visitor's browser. That means so long as they don't clear their cookies or visit on another device that hasn't yet been cookied, the affiliate ID will be available for us to “grab” it from the cookie and put it in the custom field, thus letting us know which affiliate referred this customer to us.
Important: Make sure to do this step for EVERY parameter that you want to pass to a custom field.
11 – Go to WordPress => Appearance => Editor and open your theme's functions.php file.
Add this snippet to the file (again, click download raw below to get the unmolested code):
I'd recommend using a child theme to prevent future updates from overwriting your additions to functions.php. This is a good practice in general if you work with your WordPress site often.
Related: How to Create a Child Theme, and Why You Should Be Using One
Click save. Et voila!
How to check if it's working
Now let's make sure this is actually working.
1 – Clear your cache if you're using a caching plugin in WordPress.
2 – Open an incognito window in Google Chrome.
3 – Visit your checkout page with the affiliate ID populated.
The URL should look something like this:
https://www.yoursite.com/checkout/?rid=p50P92&cf_9=vicdorfman
If you're passing several parameters, the URL will look like this:
https://www.yoursite.com/checkout/?rid=p50P92&cf_9=vicdorfman&cf_12=leslygarreau
4 – Now leave the page, and return to the same page but exclude the custom field parameter from the query string in the URL.
Remember, we're checking to see whether or not the cookie is preserved once we leave the page and come back, so if we visit the checkout page again with the cookie values defined, the custom fields will be populated from the URL anyway.
However, we need to see whether or not the fields will be populated from the cookie, so we visit the “naked” checkout URL without the custom field values in it, like so:
https://www.yoursite.com/checkout/?rid=p50P92
5 – Right Click on the screen and select Inspect.
Click the Applications tab (A), then click the cookies icon (B), and then find the custom field you created (C).

This shows us that the Affiliate ID value has in fact been stored in a cookie on your browser!
Related: Using Chrome Developer Tools to check whether your cookie is being set
6 – Now click through to the Elements tab (A), press Command + F on your keyboard to initiate a search (B), and type in the affiliate ID value that you passed earlier (C).

In this case the value is vicdorfman. And since I'm visiting this page without specifying the value of my Affiliate ID in the URL query string, and yet it still shows as the value of the hidden custom field, we know that our scripts have successfully stored and retrieved the Affiliate ID value and placed it where it belongs!
7 – At this point I'd recommend making a test sale with the affiliate ID being passed.
You'll then be able to check to see that the custom field was passed by looking in your member's contact record in MemberMouse => Manage Members => Edit => Custom Fields.
BONUS: Using Zapier we can actually parse the custom field data, and trigger various events based on it (e.g. Notify an affiliate of a referral, add their referral details into Airtable / Google Sheets, etc.)!
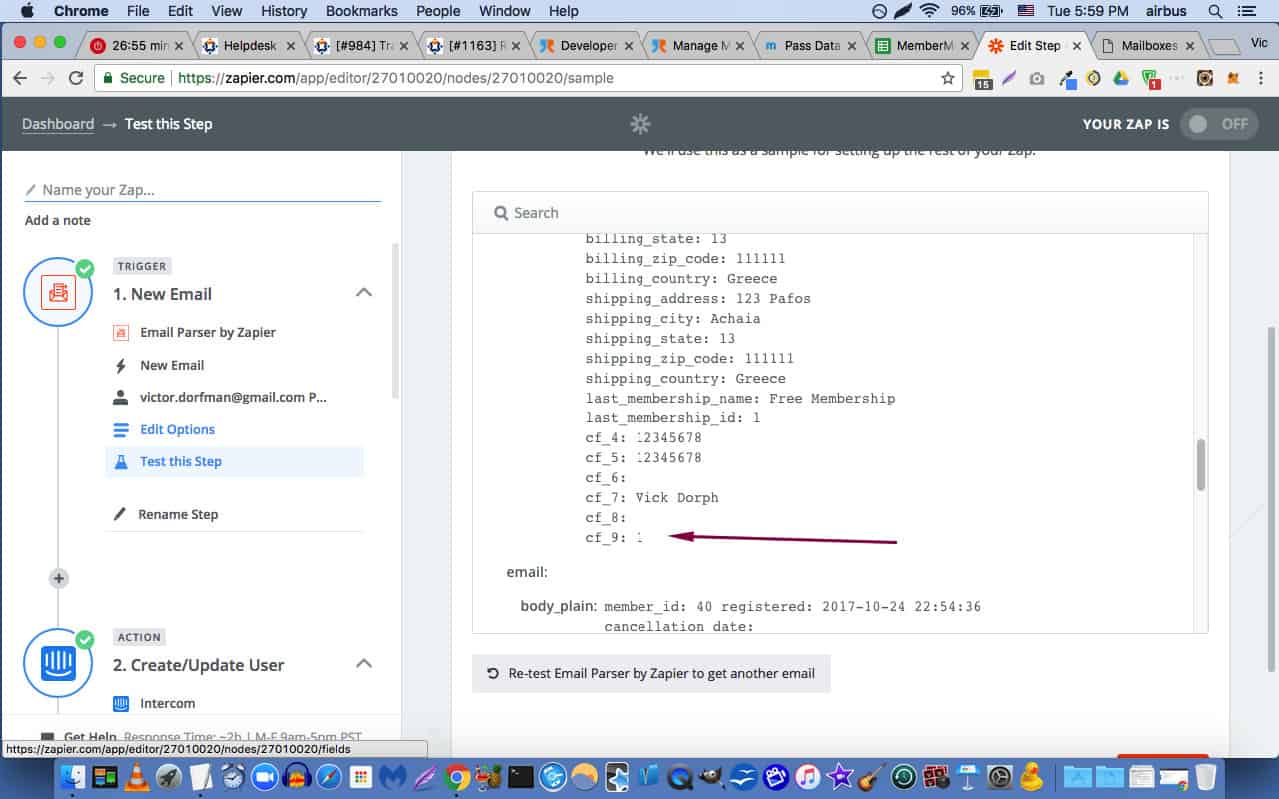
So you can create a multi-step zap to automatically add referrals to your tracking spreadsheet, send out notification emails to affiliates and to yourself, and perform any number of other actions based on this trigger.
Conclusion
As you can see, we've been able to replicate some of the core functionality of a dedicated affiliate plugin, but certainly not all of it. The main things we're missing are tracking stats and an affiliate dashboard. But again, the point of this workaround isn't to replace a true affiliate platform; it's simply to test the feasibility of a referral program for your business.
If you've satisfied yourself that a partner program is a viable marketing channel, and you're looking for a full-fledged, proper affiliate app to run your program on, I recommend iDevAffiliate. It's hands down the most robust affiliate platform I've ever worked with. In fact, both MemberMouse and Divi, whom I've been mentioning in this post, use iDevAffiliate to run their affiliate programs.
Happy promoting!


4 Responses
Thank you for introducing, i have a relevant question that might be answered here.
I was actually looking for a free affiliate marketing program and then i found revglue but not much of review on it, and me as a new affiliate marketer needs to know the product before i start making other arrangements for it like new hosting and stuff.
Can you give your view on their(revglue) program please?
I’ll try addressing you the tool revglue(.)com/tools-for-affiliates please guide through.
Appreciated
Hi Miller,
I don’t have any experience with RevGlue so I can’t speak to their quality. I just checked out their site and it looks like they’re a combination of an affiliate platform and an ad platform. They seem to partner with advertisers and help you deploy ads on your site. That’s not the same as running your own affiliate program for YOUR products and services.
If you want to sell your own products and services and have people promote it for you then you can use this tutorial (if you’re using MemberMouse, obviously), or you can use a WordPress-based affiliate plugin like AffiliateWP which a lot of our customers use and I’ve found to be solid.
Hope that helps!
Nice One, Vic. Thinking about using MM. They (MM) look like they are doing well; they employee a dozen people or so, lovely looking site, have increased prices.
I wonder why the would not add an a native ffiliate program to their features? Looks like it’s the one missing piece. Perhaps Idev commissions to them reduce their motivation to implement one!
Hi Anthony,
Yes I reckon they just partnered with iDev and called it a day. Which makes sense because iDev is really an excellent affiliate software and the trend now is towards modularity and connecting various best-in-class techs to each other via API. If I were in their place I would take the same approach.